Create New Workflow in RCOM Gateway
In RCOM Gateway, a workflow is a dynamic sequence of actions executed in response to an event, such as a device reading, API call, or scheduled trigger. Workflows are essential for transforming raw event data into meaningful automation, enabling real-time integrations with external systems, databases, notifications, and more.
Overview
A workflow defines how incoming data is processed, from the moment it enters the Gateway to its final destination. This includes operations like:
- Extracting or transforming input data
- Triggering REST or MQTT calls to third-party systems
- Modifying object records in the platform database
- Sending emails, pushing alerts, or updating dashboards
Step 1: Open Workflow Management
To begin:
- Log in to the RCOM Gateway Dashboard.
- Navigate to Workflows > Manage Workflows.
- Click + Create Workflow to launch the workflow builder.
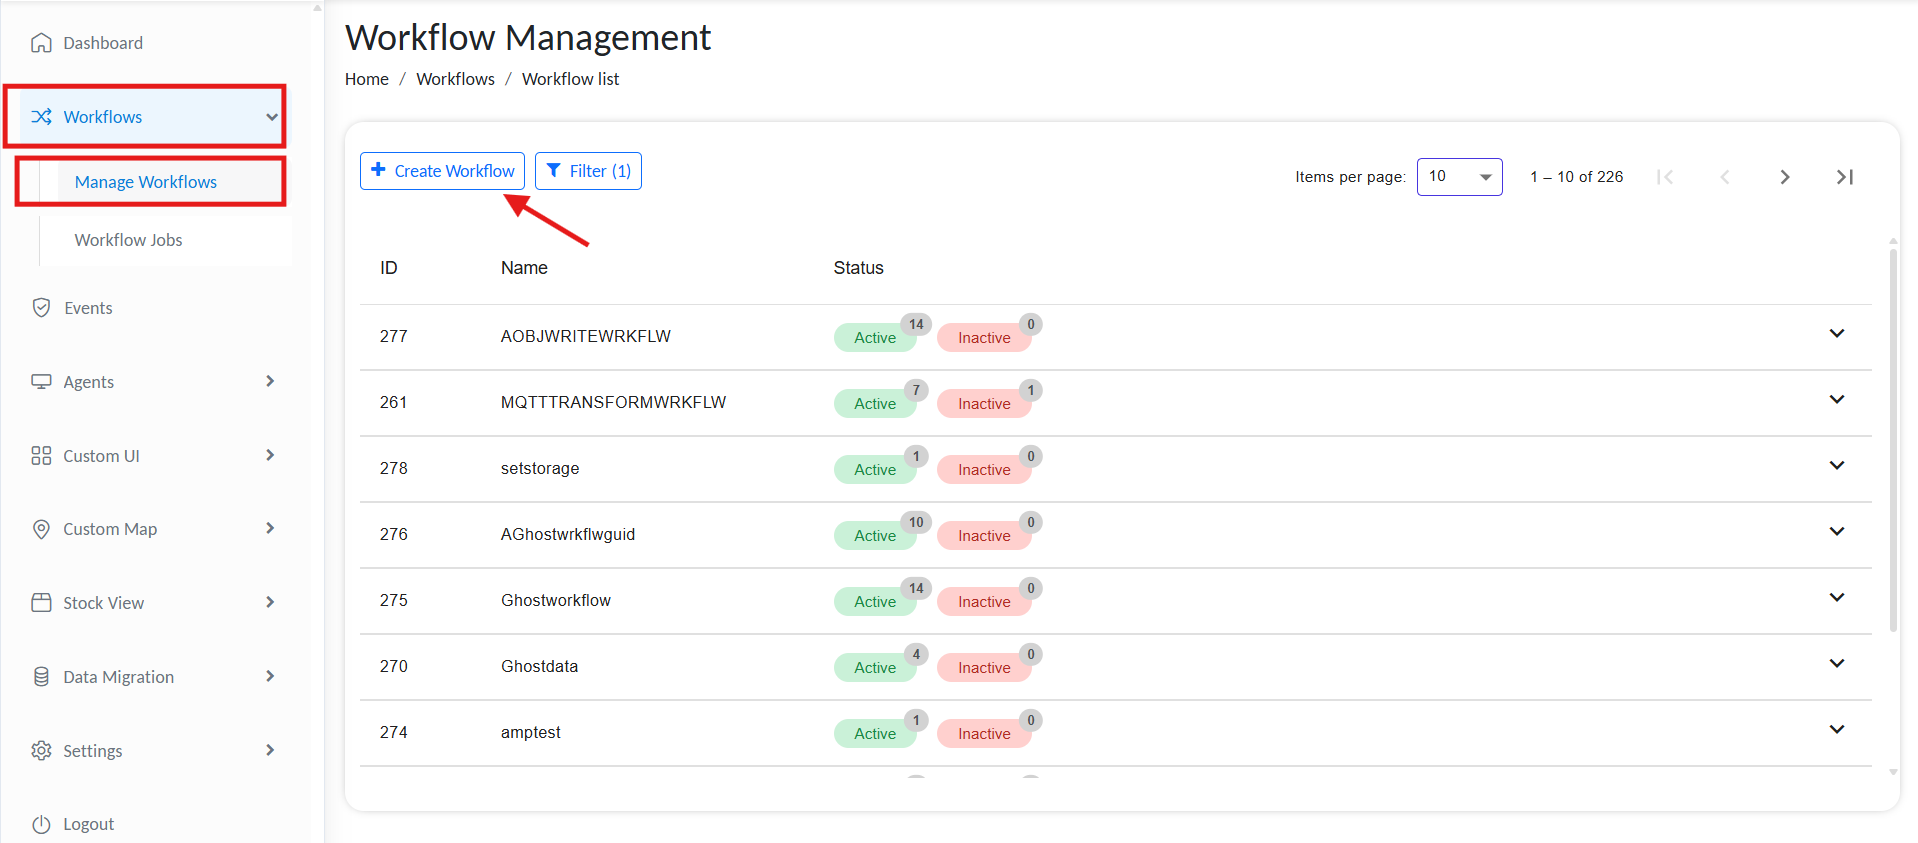
Create new workflow
Step 2: Define Workflow Metadata
The workflow canvas appears where you can configure your logic. Start with basic settings:
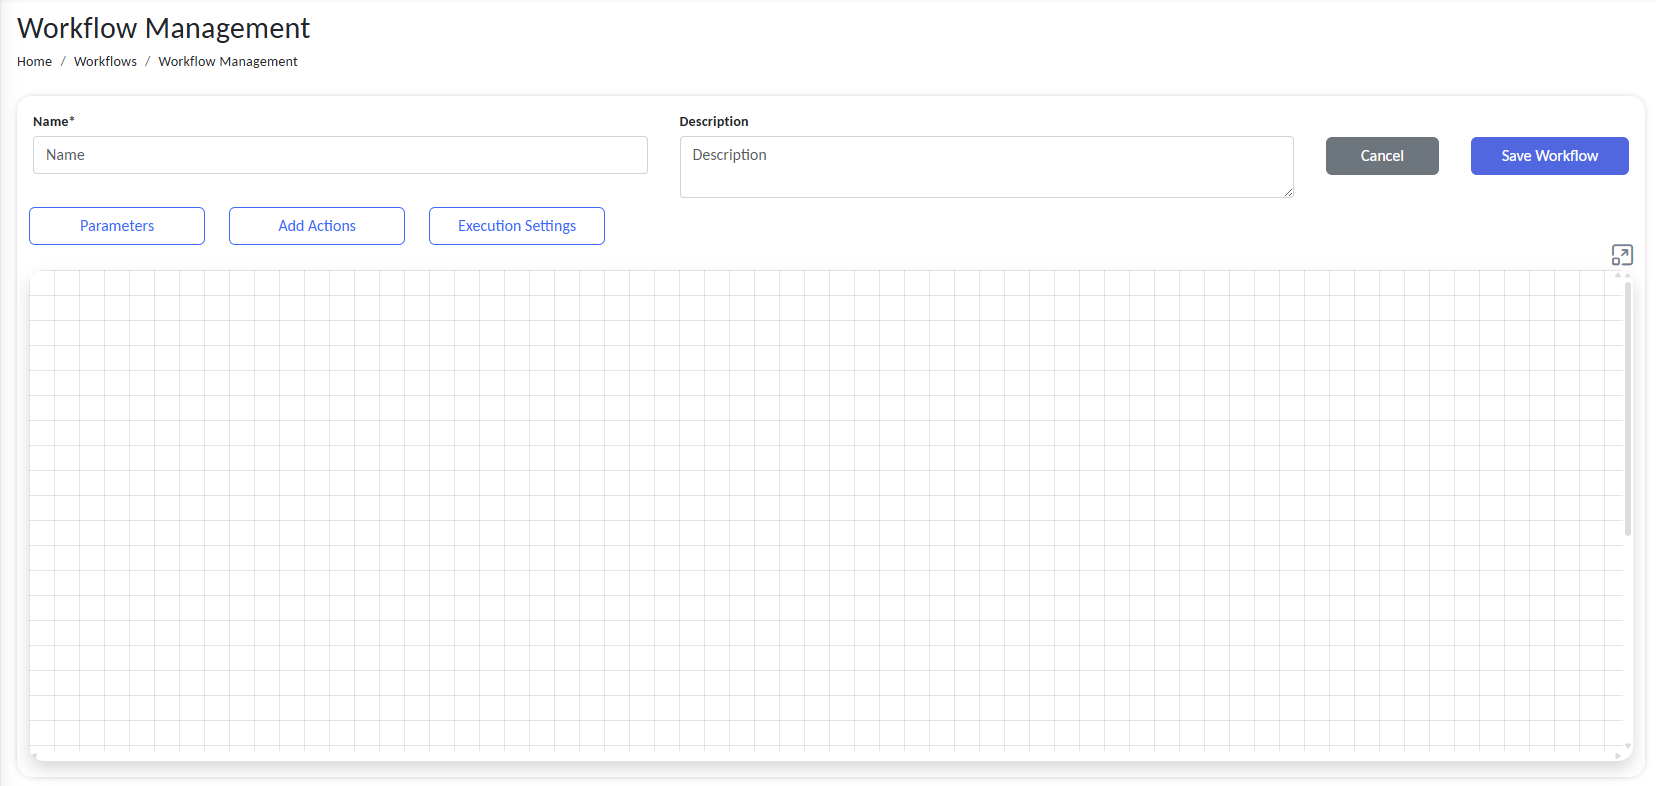
Design a new workflow
- Name (Required): Give your workflow a unique, descriptive name.
- Description (Optional): Summarize what this workflow accomplishes.
- Parameters (Optional): Declare input variables that this workflow can accept, typically passed from an Event Processor.
- Execution Settings (Optional):
- Workflow Execution Settings: Define default values for workflow process tags and process status.
- Default Job Status: A workflow status assigned to each workflow instance that use this tempalte, at the begining of the workflow exicution. This can be updated later from workflow using
SetJobStatusaction. - Default Job Tags: Tags are used for categorization, filtering, monitoring, and reporting purposes. If you define a default it will be added to all workflows jobs using this template. New tags can be added with
AddJobtagsaction and existing once can be removed withRemoveJobtagsaction.
- Default Job Status: A workflow status assigned to each workflow instance that use this tempalte, at the begining of the workflow exicution. This can be updated later from workflow using
- Runtime Configuration : Controls how the workflow engine executes and logs this workflow.
- Execution Timeout (ms): Maximum allowed exicution time in milliseconds. The workflow will be automatically terminated after this duration.
- Log Level : Define the level details you want to preserve in the workflow log. The selected level and higher will only be saved.
- Persist Final Context in DB : Save the final exicution context in database. Disable to save space.
- Workflow Execution Settings: Define default values for workflow process tags and process status.
It is recommended to disable the Persist Final Context in DB option when deploying workflows to a production environment. If a workflow retrieves large amounts of data from the database on each execution, storing that data in the context for reference can lead to significant database storage consumption over time. For finer control, it is recommended to use the FlushContext workflow action to whitelist or blacklist specific variables. This allows you to retain only the required data in the context while excluding unnecessary or large payloads.
To add a parameter:
- Click the Parameters tab > Add New.
- Provide a name (e.g.,
batchId,timestamp). - Choose a data type:
String,Int,Bool,DateTime,Decimal,Guid,List,Dictionary,GhostData, etc. - Click Save.
Step 3: Add and Connect Actions
Each workflow is built using Action Blocks, modular operations representing a specific task.
To add an action:
- Open the Actions panel.
- Drag a block (e.g.,
HttpRequest,SetVariables,SendEmail) onto the canvas. - Configure its inputs and outputs.
- Connect blocks using arrows to define execution flow and logic.
Action blocks may receive input from previous blocks and output data to subsequent ones.
Step 4: Understand Connection Logic
RCOM Gateway uses visual connectors to represent workflow transitions. Each connection line signifies what happens based on an action’s result:
| Line Type | Meaning |
|---|---|
| Green Solid | Success (Result = True) and this outcome is mandatory |
| Red Solid | Failure (Result = False) and must be handled |
| Green Dashed | Success path that is optional (not required for workflow to proceed) |
| Red Dashed | Optional failure branch |
Use these to build branching, error handling, and conditional flows.
Step 5: Save the Workflow
Once your logic is complete:
- Verify all action blocks are connected appropriately.
- Ensure required inputs and outputs are defined.
- Click Save Workflow to persist your configuration.
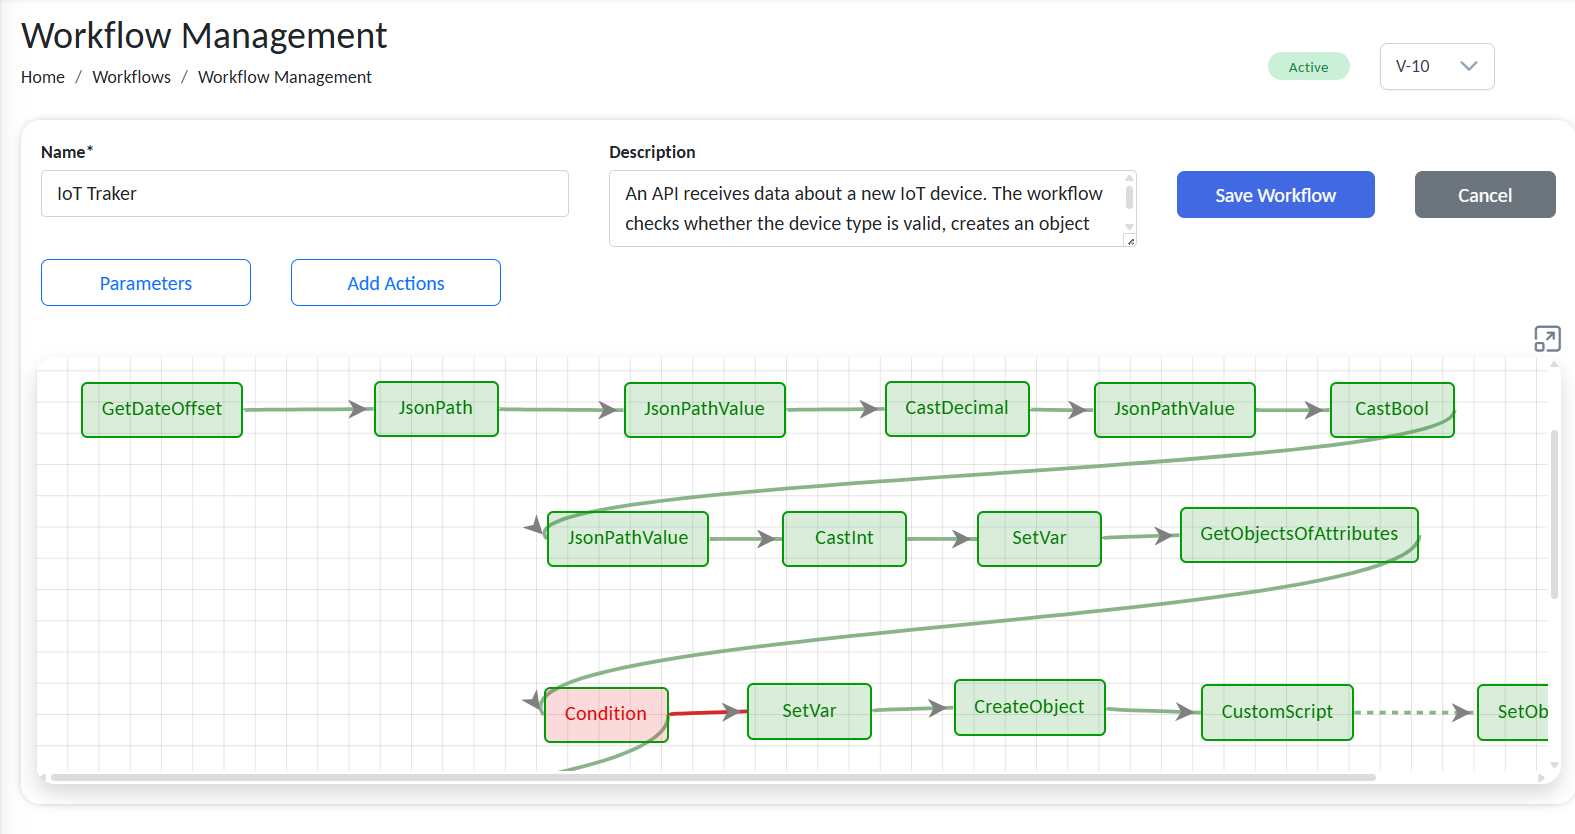
Example workflow
Action Block Categories
Action blocks are grouped by function. Below is a categorized list for easy reference:
For detailed information on Action blocks and setup, refer to the guide:>>Workflow Actions.
🧮 Data Processing
| Action Name | Purpose |
|---|---|
| AddTime | Modify datetime by adding/subtracting durations |
| JsonPathValue | Extract typed data using JsonPath |
| JsonPath | Extract strings from JSON values using path syntax |
| SplitString | Convert a string into a list based on a separator |
| JsonSerializer | Convert object to JSON format |
| XPath | Run XPath on XML to extract values |
| DecodeData | Decode structured input by command rules |
| Decode6Bit | Decode EPC hex to ASCII |
| DecodeGS1 | Decode EPC to GS1 URI formats |
| Encode6Bit | Encode ASCII to 6-bit EPC hex |
| EncodeGS1 | Encode EPC URN to GS1 URI format |
| EncodeGs1TagUri | Convert GS1 EPC URN tag format to GS1 EPC URI |
| GetKeyList | Extract all keys from a dictionary into a list |
| MatchAndSortList | Match and sort items in a list |
| RegexMatch | Match or extract substrings using a regular expression |
| ReplaceWordPlaceholders | Replace placeholders in a Word document template |
🔁 Control Flow
| Action Name | Purpose |
|---|---|
| Condition | Branch logic based on Boolean expression |
| While | Execute steps while a condition holds |
| ForEach | Iterate over list/dictionary elements |
| CustomScript | Execute a custom script using RCOM Gateway Interpreter |
| Sleep | Pause workflow execution for a specified duration |
| FlushContext | Flush intermediate workflow context data |
🌐 External Interaction
| Action Name | Purpose |
|---|---|
| WebRequest | Send configurable HTTP requests |
| WebRequest3 | Lightweight HTTP request block |
| MQTTPublisher | Publish messages to an MQTT broker |
| SendEmail | Send emails via configured or custom SMTP |
| CustomSQL | Execute SQL queries against a SQL Server database |
| CustomMySQL | Execute SQL queries against a MySQL database |
| CustomPostgresSQL | Execute SQL queries against a PostgreSQL database |
| MQTTChallengeResponse | Handle MQTT challenge-response authentication |
| PublishRabbitMQ | Publish messages to a RabbitMQ broker |
🧱 Object/Storage Management
| Action Name | Purpose |
|---|---|
| CreateObject | Create a new object |
| SetObjectAttributes | Update object attributes dynamically |
| SetStorageLocation | Modify object's storage location |
| SetGeoLocation | Update object’s latitude and longitude |
| ReadObject | Get attributes of a specific object |
| ReadObjectGroup | Retrieve metadata of an object group |
| GetObjectsOfObjectGroup | Retrieve all objects from a group |
| GetObjectsOfAttributes | Retrieve objects that match specified attributes |
| GetObjectsOfStorage | Retrieve objects from storage using location filters |
| LookUpAttribute | Look up a specific attribute of a matched object |
| LookUpAttributes | Look up all/specific attributes of a matched object |
| DeleteObject | Delete an object (optionally with history) |
| DeleteObjectInstant | Instantly delete an object from an Object Group |
| CheckStorageExists | Verify whether a storage entity exists at a given level |
| CreateStorageLocation | Create a new entry in the storage hierarchy |
| GetAttachment | Retrieve a file attachment linked to an object |
| GetGroup | Retrieve a group name by its ID |
| GetObjectChangeHistory | Retrieve historical attribute changes for an object |
| GetObjectGroupSchema | Retrieve the schema definition of an Object Group |
| GetStorageAreas | Return all defined storage areas with parent IDs |
| GetStorageBins | Return all defined storage bins with parent IDs |
| GetStorageLocations | Return all defined storage locations with parent IDs |
| GetStorageNumbers | Return all top-level storage numbers |
| DeleteAttachment | Delete a file attachment from an object |
| SaveAttachment | Save a file as an attachment to an object |
| SetObjectInstant | Instantly update object attributes during execution |
| SetStorageLocationByID | Set an object's storage location using numeric IDs |
🔄 Casting / Conversion
| Action Name | Purpose |
|---|---|
| CastBool | Cast value to Boolean |
| CastDateTime | Cast value to DateTime |
| CastDateTimeOffset | Cast value to DateTimeOffset |
| CastDecimal | Cast value to Decimal |
| CastInt | Cast value to Integer |
| CastString | Cast value to String |
| CastObject | Cast value to generic Object |
| CastObjectList | Cast value to List of Objects |
| CastDictionary | Cast value to Dictionary |
| CastDictionaryList | Cast value to List<Dictionary> |
| ConvertToGhostData | Convert to GhostData object (custom structured) |
| GenerateGuid | Generate a new globally unique ID |
🛠️ Utility
| Action Name | Purpose |
|---|---|
| SetVar | Assign values to variables |
| StartTimer | Start a timer and execute logic after it ends |
| GetDate | Retrieve current date and time |
| GetDateOffset | Retrieve current date with timezone offset |
| Log | Log messages with different severity levels |
| UpdateGlobalVar | Update a client/global-level variable |
| SetHttpResponse | Define HTTP response for web-triggered workflows |
| AddJobTags | Assign one or more tags to the current workflow job |
| RemoveJobTags | Remove one or more tags from the current workflow job |
| SetJobStatus | Set the logical job status of the current workflow job |
| SetDictionary | Create or populate a dictionary variable |
| ValidateDecimalLimits | Validate a decimal value against defined min/max limits |
📁 File Operations
| Action Name | Purpose |
|---|---|
| CreateExcelSheet | Create an Excel file from structured data as a byte array |
| CreateTemporaryFile | Save a file (byte array) to the database and return a File ID |
| LoadCsv | Parse CSV content (bytes) into structured workflow data |
| LoadExcelSheet | Parse an Excel file (byte array) into structured workflow data |
| LoadTemporaryFile | Retrieve a stored file from the database by its File ID |
For detailed information on Action blocks and setup, refer to the guide:>>Workflow Actions.
Next Steps
Once you've created and saved your workflow, you can test it by triggering the associated event processor. Monitor the logs and data flows to ensure the workflow behaves as expected.