Manage Users, Roles, Access Groups
This article provides a comprehensive guide to managing access within the RCOM Gateway using the Admin Console. It includes instructions for configuring users, assigning roles and permissions, organizing access groups, and managing scoped variables.
Overview
The RCOM Gateway operates in dynamic environments where different user groups, from operators to administrators, interact with diverse system modules and interfaces. Access control in this context has three key dimensions:
- Who can access the system (users)
- What operations they are allowed to do (roles & permissions)
- Where they can do it, which areas of the gateway they can access (access groups & variable scopes)
This document explains how to configure each of these components to ensure operational security and control across workflows, UI elements, and data layers.
Users
A user represents an authenticated individual typically an operator, engineer, or administrator with access credentials and a permission model.
Each user must have:
- A unique login (email)
- A password
- At least one assigned Role (Which defines what operations they can perform).
- One or more Access Groups (Sections of the gateway the user is allowed to access/perform allowed operations).
Creating a User
To create a new user:
-
Go to Settings > User Settings > Manage Users
-
Click + Create New User
Manage users
- Fill in the following fields:
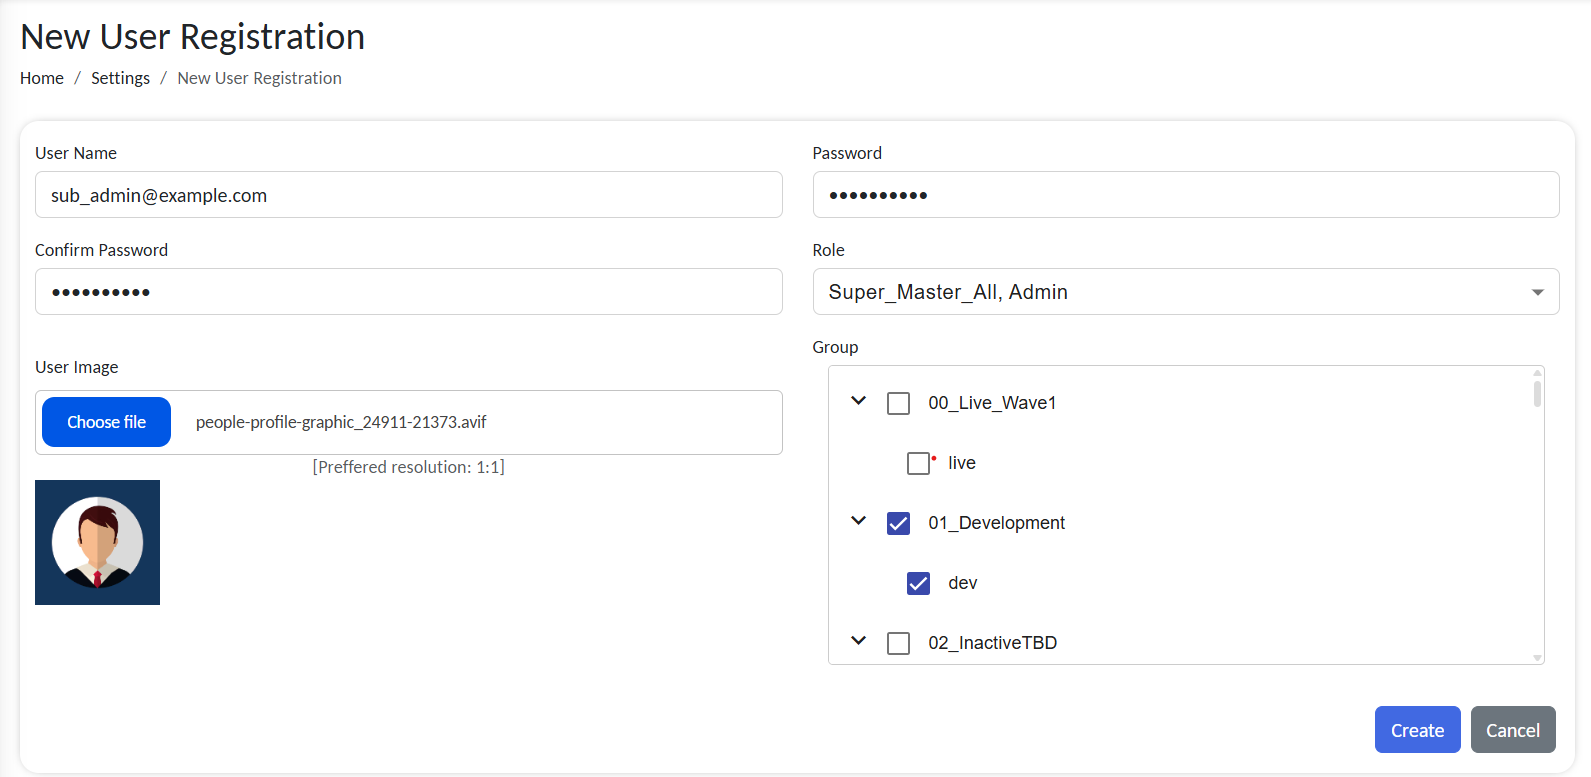
Configure users
| Field | Description |
|---|---|
| User Name | The login credential. Must be a unique eamil. Used for authentication. |
| Password | Choose a strong password for security. Confirm before saving. |
| Role | Select a predefined Role (see section below). |
| Group | Select one or more groups defining what the user can view/interact with. |
| User Image | Optional. Used for personalization and user identification in UI. |
Email must be valid and unique across the system. Duplicates are not allowed.
- Click on Save to register the users.
Once saved, the user appears in the user list, and their permissions take immediate effect.
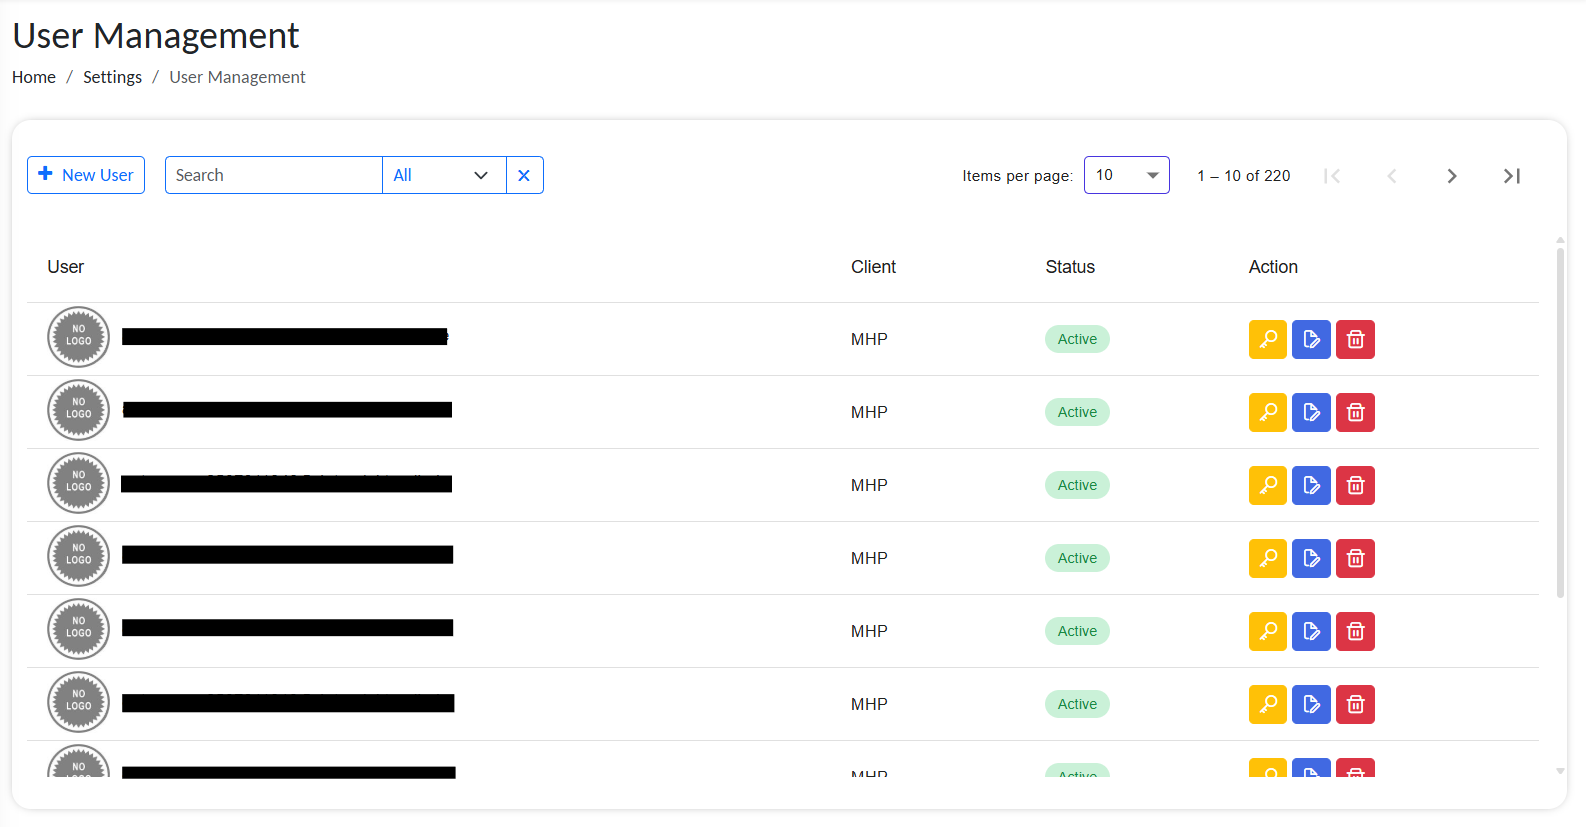
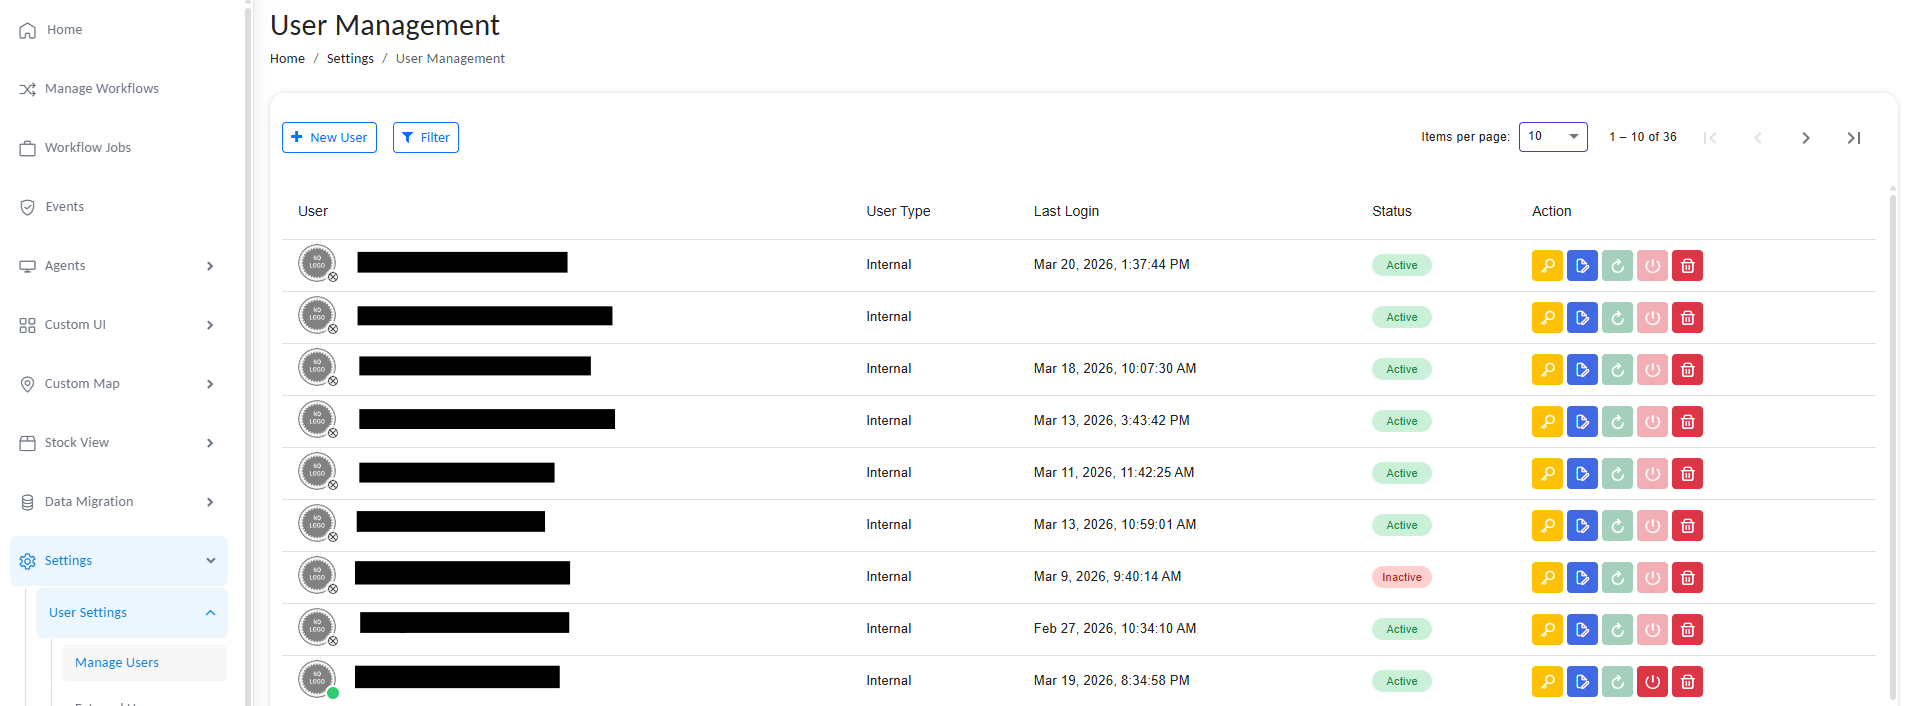
List of active users
User List Details
The user management list displays comprehensive information about each user, allowing administrators to monitor and manage user access effectively.
Each user entry includes:
| Column | Description |
|---|---|
| Profile Picture | User's avatar or profile image. A green dot indicator in the corner shows if the user is currently online. |
| Username | The unique login email credential used for authentication. |
| User Type | The classification of the user (e.g., Admin, Operator, Viewer). Indicates the role category. |
| Last Login Time | Timestamp of the user's most recent login session. Helps administrators track active vs. inactive users. |
| Status | Current state of the user account (Active, Inactive, Locked, etc.). Indicates whether the account is enabled. |
| Actions | Quick-access menu with administrative options (see below). |
Available Actions
The Actions column provides quick options for user management:
- Reset Password – Generate a temporary password and send it to the user's email.
- Edit User – Modify user details, roles, groups, or profile information.
- Force Logout – Immediately terminate the user's active sessions across the system.
- Delete User – Permanently remove the user account and all associated permissions.
Important: Force logout and delete operations cannot be undone. Use caution when performing these actions on active accounts.
Assigning Roles
When creating or editing a user, select the Assigned Role from the dropdown.
Roles determine:
- What actions can a user perform (Read, Write, Execute, Delete) on each sections of the gateway.
- For example a role may allow user to view the stocks but not edit it.
You can change a user’s role at any time from the user profile settings.
Group Access Assignment
During user creation or editing, specify one or more Access Groups.
- Access Groups determine what data, system interfaces, and more users can interact with.
- The user can only see and work with data or interfaces that belong to those groups.
Users can be members of multiple access groups and inherit access from all of them.
Roles and Permissions
A Role defines what a user is allowed to do within the system. Permissions are granted at the module level, such as Workflows, Endpoints, Access Groups, etc. and are action-specific (Read, Write, Update, Delete).
For example, a role might allow users to:
- Read and execute workflows, but do not edit them.
- Manage endpoint configurations, but can't delete any.
- View logs without deleting data
Creating Roles
To define a new role:
- Go to Settings > Roles & Permissions > Roles
- Click + Add New Role
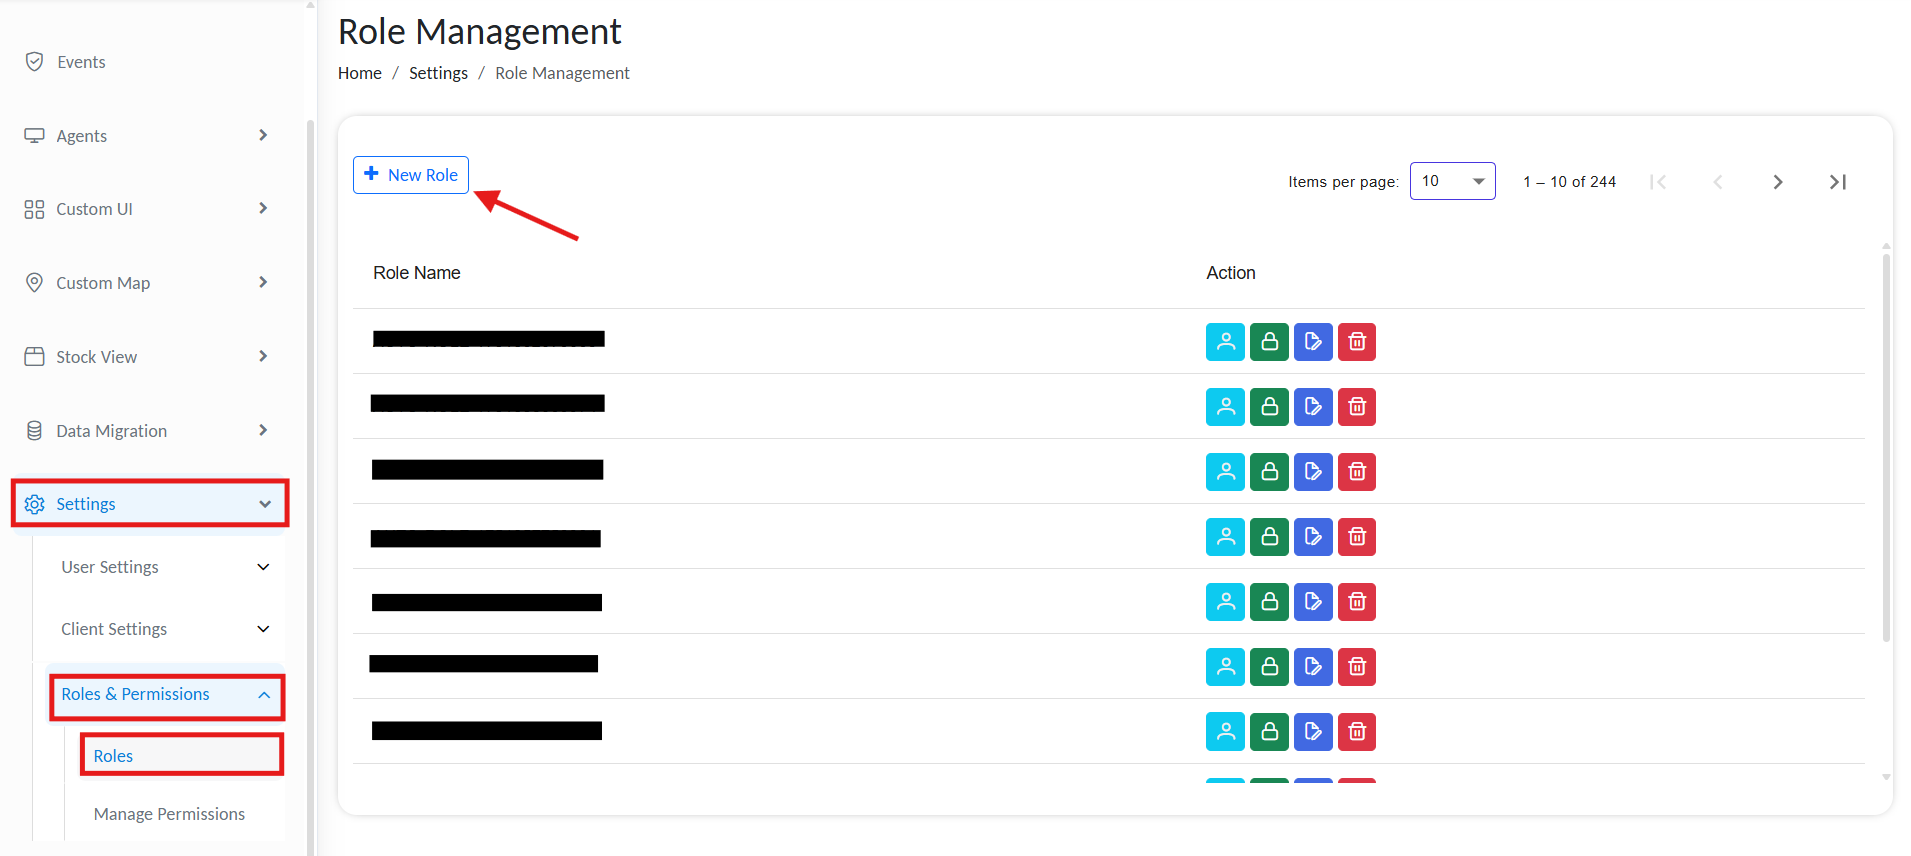
Manage user roles
Add new user
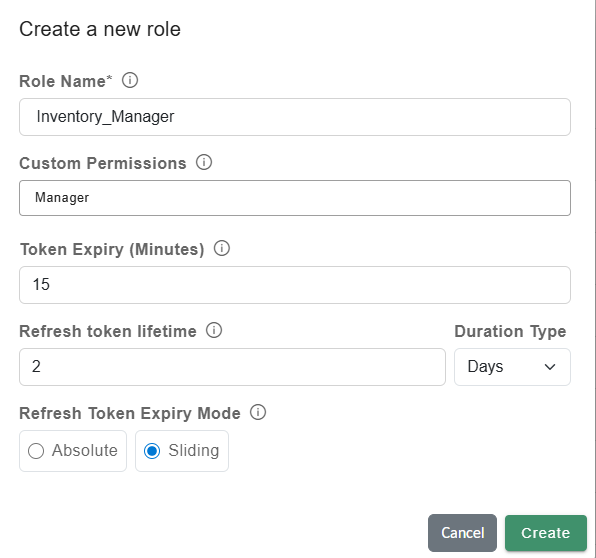
- Role Name: A unique system role name (e.g., Inventory_Manager, Line_Supervisor)
- Custom permissions: Comma-separated custom permission values for the UI.
Custom Permissions provide an additional layer of access control for custom UI implementations. They allow you to restrict specific actions or UI components so that only users with the required permission can access them.
Custom permissions are assigned to roles in the system and can then be evaluated within custom UI logic. By checking whether the current user has a particular permission, the UI can dynamically control which components or actions are available.
Example
You have a custom UI assigned to two roles:
- Floor Manager
- Inventory Manager
You create a Custom Permission such as MANAGER and assign it only to the Inventory Manager role.
Within the custom UI, permission checks are performed for specific actions such as managing inventory data. Components such as inventory tables or management buttons are displayed only if the logged-in user has the required permission.
As a result, both roles can access the same overall UI, but only users with the Inventory Manager role (who have the MANAGER permission) can view and interact with the inventory-related controls.
You can assign Custom Permissions to specific HTML components. Only roles with the assigned Custom Permission will have access to these components.
-
Token Expiry: Duration in minutes that an access token remains valid. After expiry, the client must obtain a new token, usually via a refresh token. Use shorter expiry times for access tokens.
-
Refresh token lifetime: The refresh token is issued when the access token expires and expires after this period of time.
- Absolute expiry logs out the user when the time limit is reached, regardless of activity.
- Sliding expiry resets the timer on each active session and expires after the selected period of inactivity.
-
Click on Create. The new role appears in the Roles list.
If multiple roles are assigned to a user, the token settings from all roles are evaluated. For token expiry and refresh token lifetime, the shortest configured value is applied. If any assigned role uses Absolute expiry mode, the user will also use Absolute mode.
Example
Role One:
- Token expiry = 5
- Refresh token lifetime = 50
- Expiry mode = Sliding
Role Two:
- Token expiry = 20
- Refresh token lifetime = 20
- Expiry mode = Absolute
If a user is assigned both Role One and Role Two, the resulting configuration will be:
- Token expiry = 5
- Refresh token lifetime = 20
- Expiry mode = Absolute
Setting up Permission
Permissions define the specific actions a user can perform within each module, such as creating, editing, updating, or deleting workflow jobs, endpoints, and configurations. Each role is configured using a Permission Matrix, which maps these actions across modules.
Example: A role might allow a user to view and run workflows, but not modify or delete them.
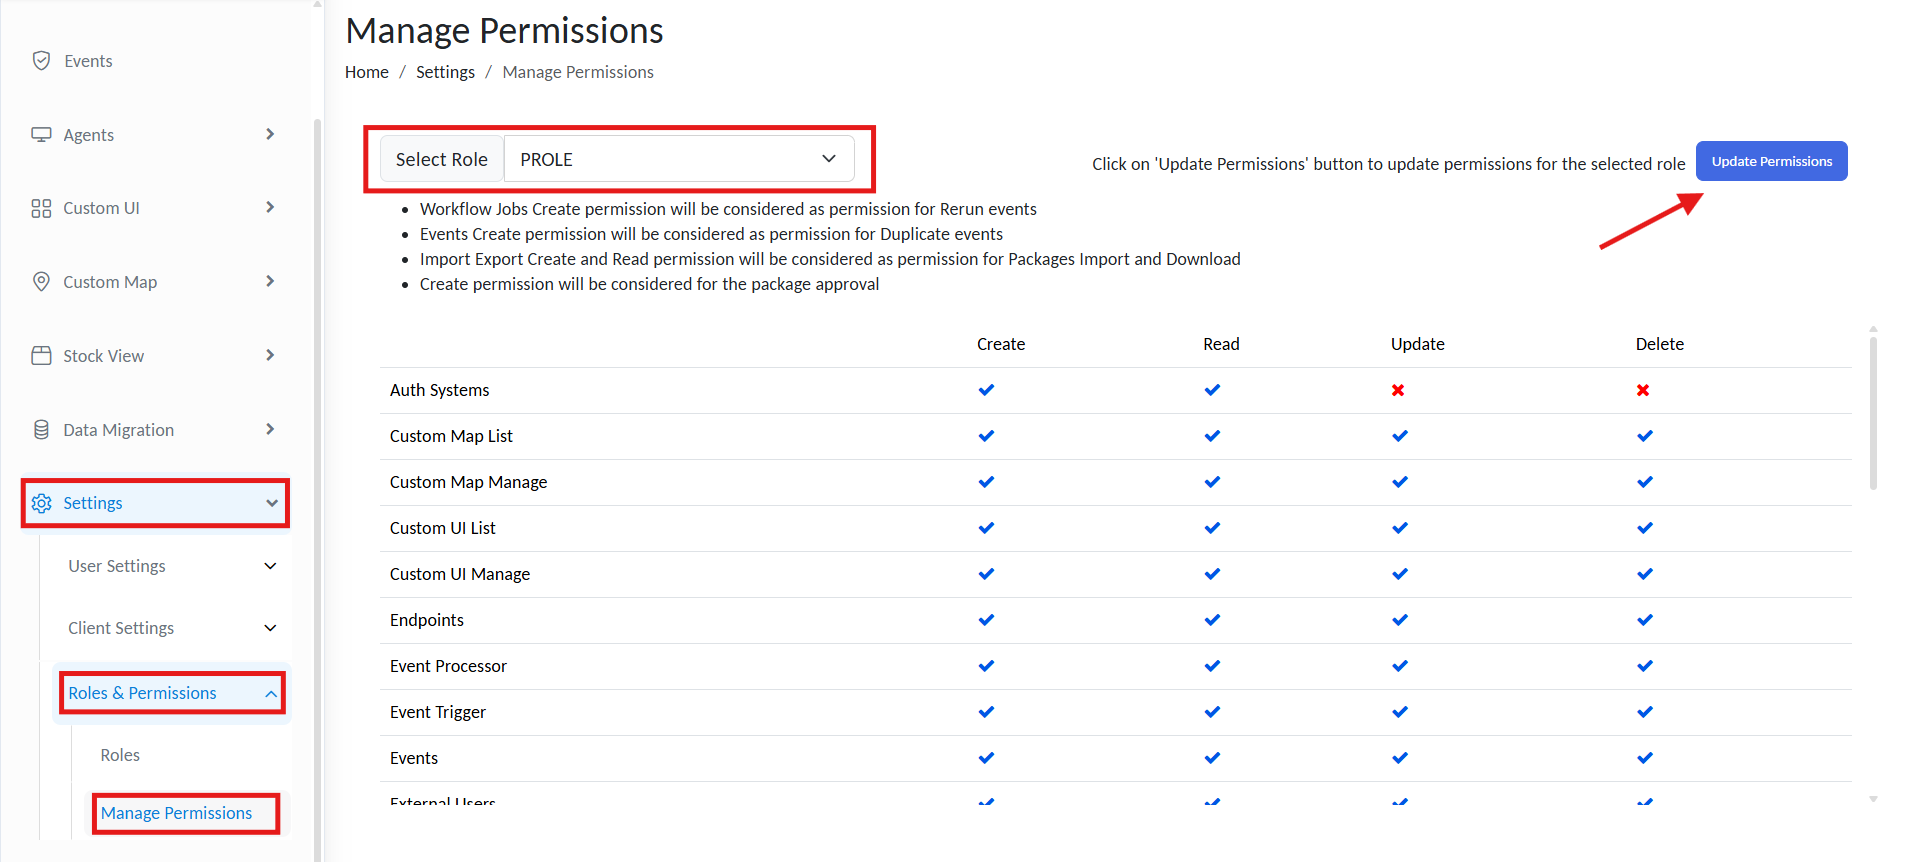
To assign permissions:
- Click Manage Permissions on the role card.
or navigate to Settings > Roles and Permissions > Manage Permissions. - Make sure the right Role name is selected from the topbar.
- Click on Update Permissions
Manage permissions
- Use the Permission Matrix to enable/disable actions per module:
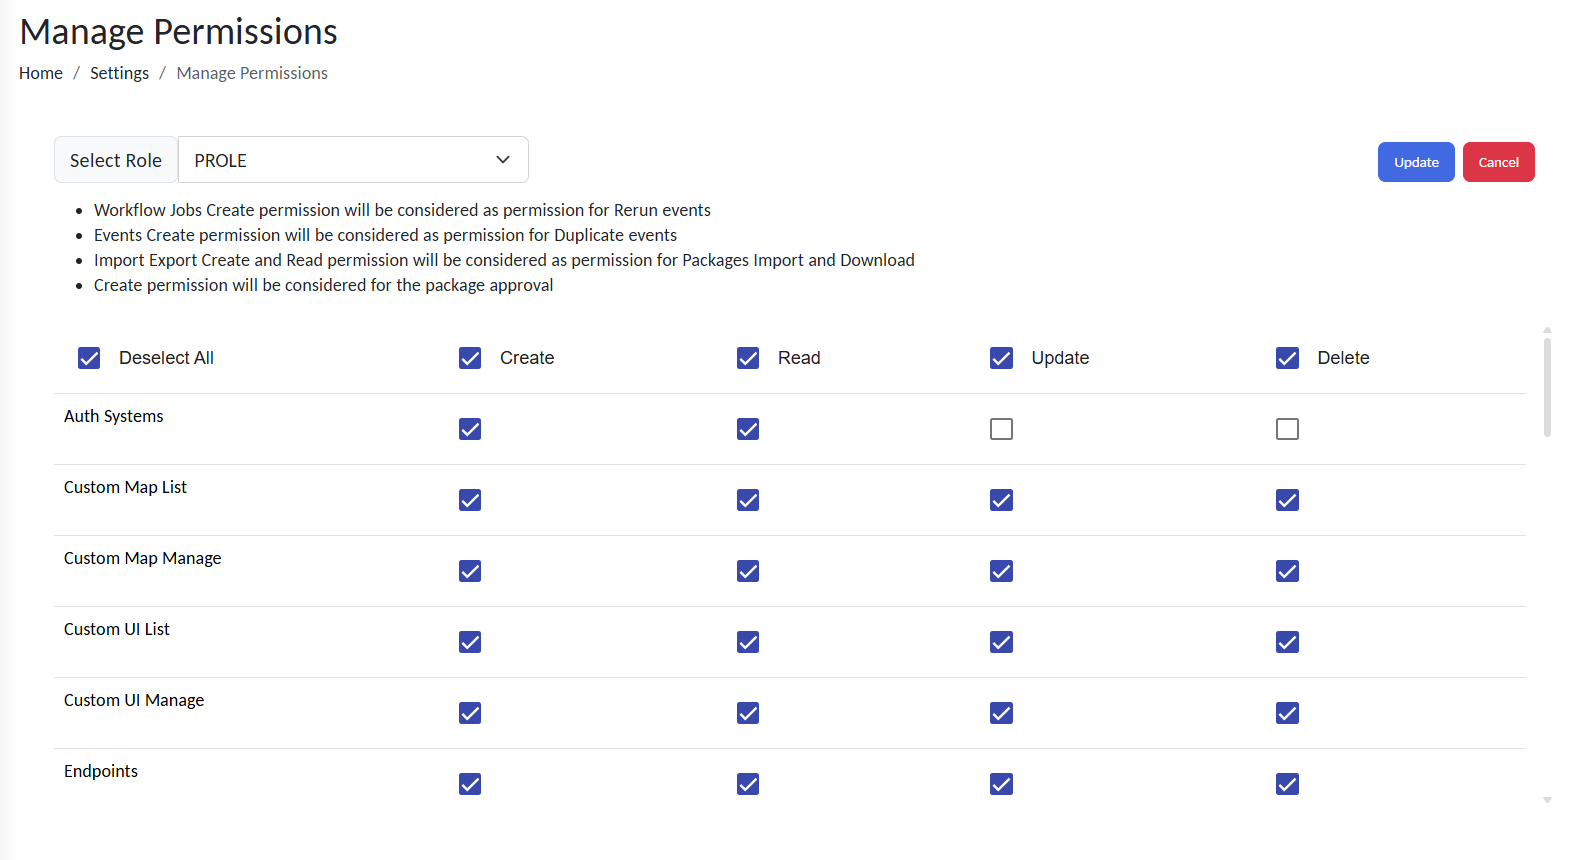
Update permissions
| Action | Definition |
|---|---|
| Read | View module data and configurations |
| Write | Create new entities (e.g., endpoints, objects) |
| Update | Modify existing entities or configurations |
| Delete | Remove entities or data permanently |
- Click on Update to save changes.
Access Groups
Access Groups control where users can apply their permissions or what parts of the system a user can access. They determine what UIs, maps, and data sets are visible or accessible to a user.
Example:
If a user is assigned the “Viewer” role and linked to the Warehouse A Access Group:
- They can view (but not modify) workflows
- Only maps, UIs, and data tagged under Warehouse A will be visible
Access Groups act as logical containers for scoping user access across:
Creating Access Groups & Subgroups
To manage Access Groups:
- Go to Settings > Clients > Groups
- Click + Create Group
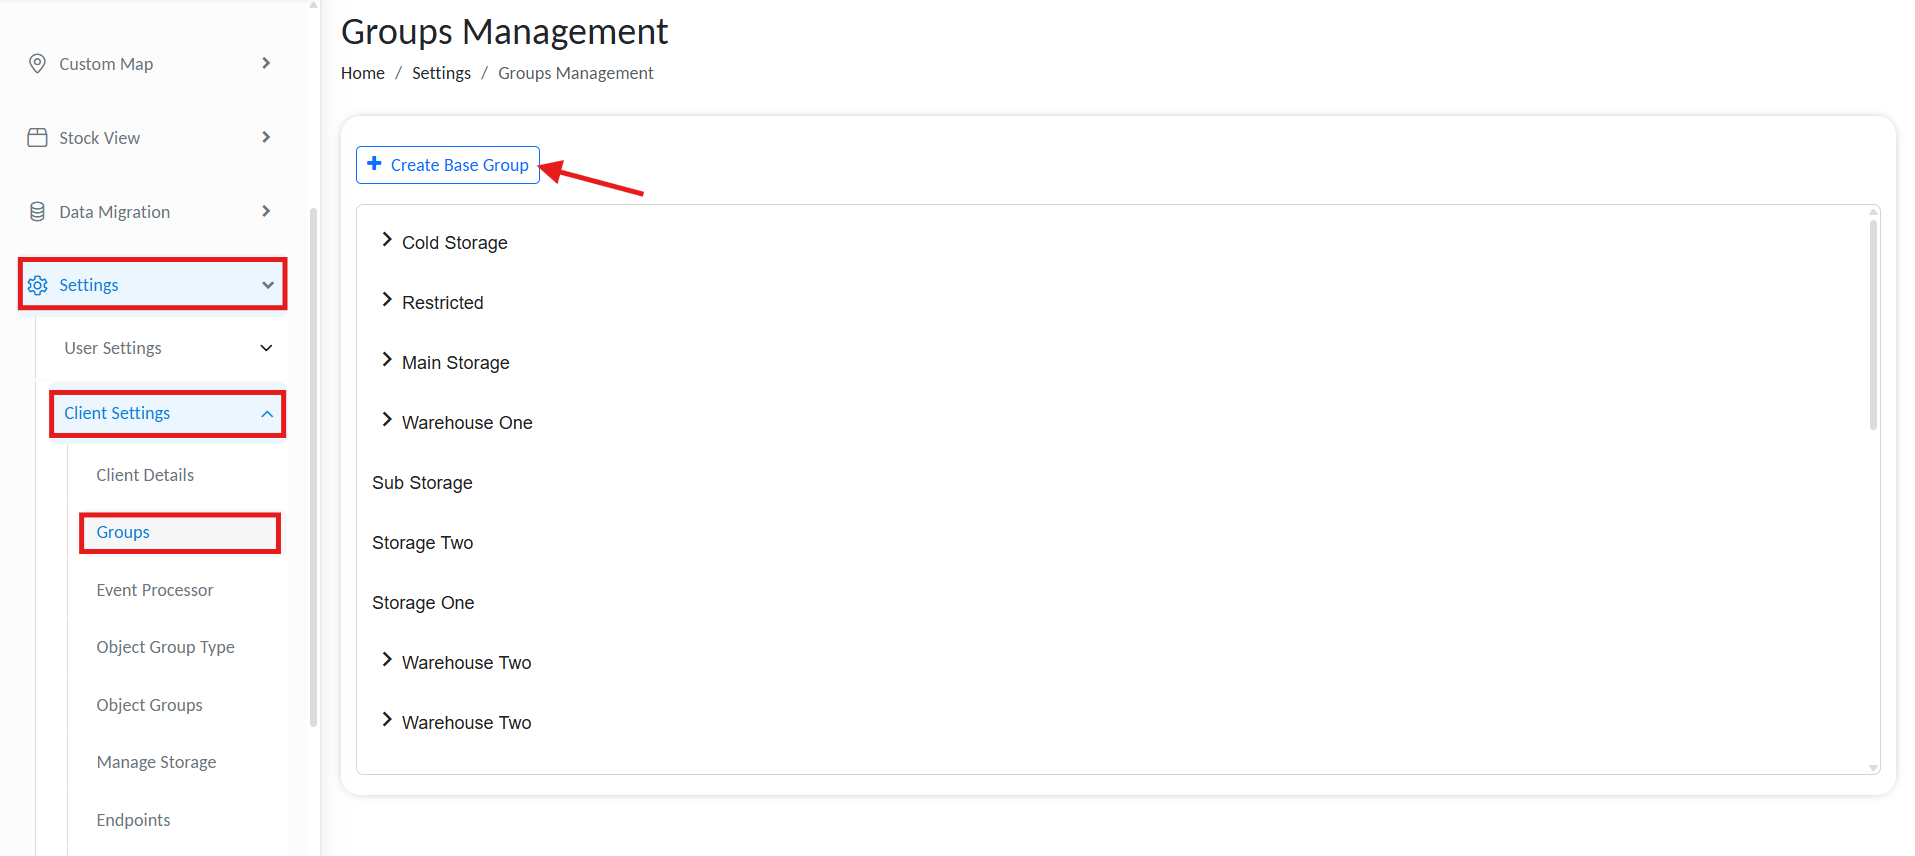
Manage Access Groups
- Specify a Group Name
- Click Create.
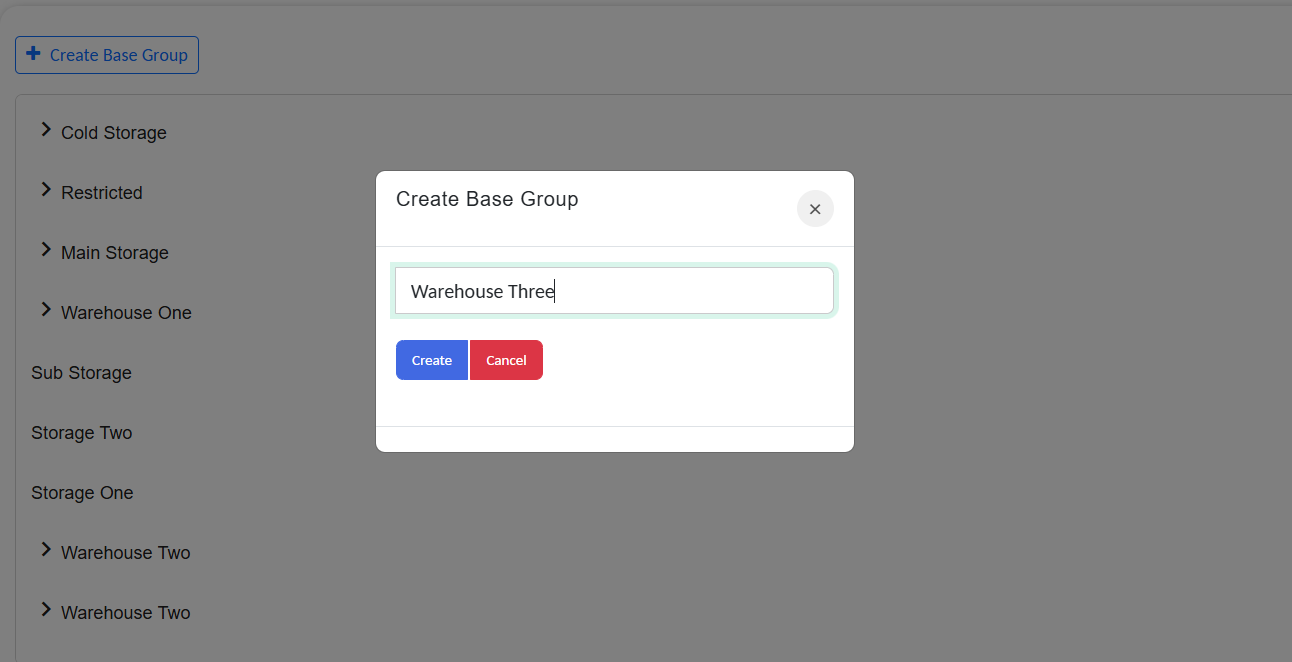
Manage Access Groups
To nest a group under a parent, click the inline + icon. This structure simplifies permission management, as permissions and access granted to the parent group automatically apply to all child groups.

Manage Access Sub Groups
Example:
Logistics
├── Warehouse A
└── Cold Storage
Variable Management in Groups
Access Groups also support shared global variables that can be consumed across tagged modules.
➕ Adding Group-Level Variables
- Go to Settings > Clients > Groups
- Locate the desired group
- Click the gear icon ⚙️ next to the group name
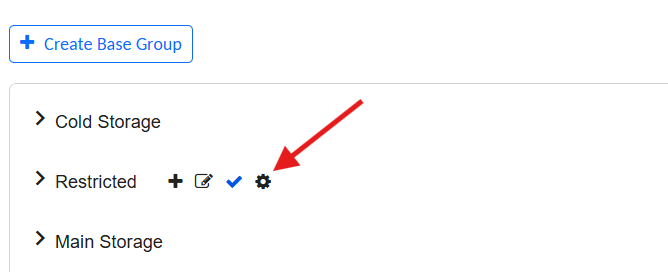
Add global variables for accesss groups
- Click + Add New Variable
- Provide the following:
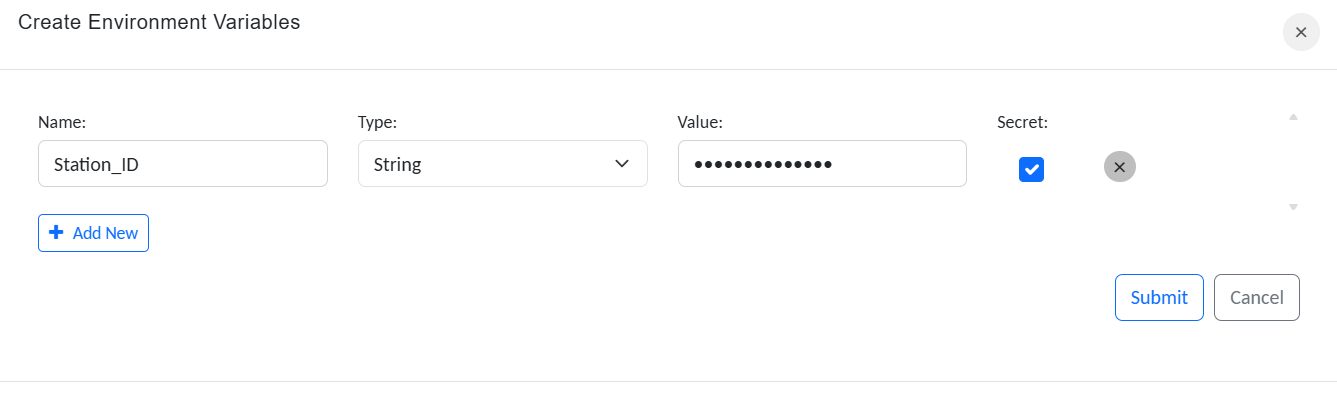
Create variables for accesss groups
| Field | Description |
|---|---|
| Name | Identifier (used in expressions/scripts) |
| Type | Data type (String, Int, Boolean, etc.) |
| Value | Default or current value |
- Click Submit
These variables are automatically scoped. Only Tagged modules(Map or interfaces) within the group can reference them.
✅ Best Practices and Recommendations
- Use meaningful Role names that match job functions (e.g.,
MaintenanceLead,ITAdmin) - Organize Access Groups to reflect real-world hierarchies (e.g., site, department, region)
- Regularly review user-role-group mappings
- Minimize use of “admin” roles to reduce exposure