Object Groups in the RCOM Gateway
For many automated workflows, simply reacting to an event isn't enough. You often need to store, retrieve, and manage information related to the entities involved in these events. This is where Object Groups in the RCOM Gateway become essential. They provide a structured way to manage persistent data, acting as the memory for your automated processes.
This guide will explain what Object Groups, Objects, and Object Structures are, and walk you through creating and configuring them within the RCOM Gateway.
Understanding the Building Blocks:
-
Object: Think of an Object as a detailed digital record or "digital twin" of a real-world entity or concept. It holds specific information (attributes) about that item.
- Warehouse Example: An Object could represent a specific pallet (
PALLET001), detailing its contents, current location, and last scan time. - Healthcare Example: An Object might represent a particular patient (
PATIENT4567), storing their assigned room, vital signs history, and medical alerts. Or, it could be a medical device like an infusion pump (PUMP789), tracking its status, location, and maintenance schedule.
- Warehouse Example: An Object could represent a specific pallet (
-
Object Group / Structure: An Object Group in the RCOM Gateway is a named collection of individual data records (Objects) that all conform to a specific Object Structure.
This Object Structure acts as the blueprint, defining the set of attributes (likeproduct_idorlocation) and their data types, which every Object within that group will possess.
Essentially, when you define an Object Group, you are simultaneously establishing its underlying Object Structure.
Example of an Object (as data)
Here's how data for a single "product" Object might look in a simplified JSON format after being scanned:
{
  "object_type": "product",
  "product_id": "PRD001",
  "location": "Aisle-3",
  "scanned_at": "2025-05-15T10:23:00Z"
}
In this example:
object_type: Indicates this Object belongs to a group representing "products".product_id: A unique identifier for this specific product.location: The current location where the product was scanned.scanned_at: The timestamp of the scan event.
Create a New Object Group
Step 1: Navigate to the Object Group Settings
From the main RCOM Gateway dashboard:
- Go to Settings > Client Settings > Object Groups. This page lists all available object groups.
- Click New Object Group to begin.
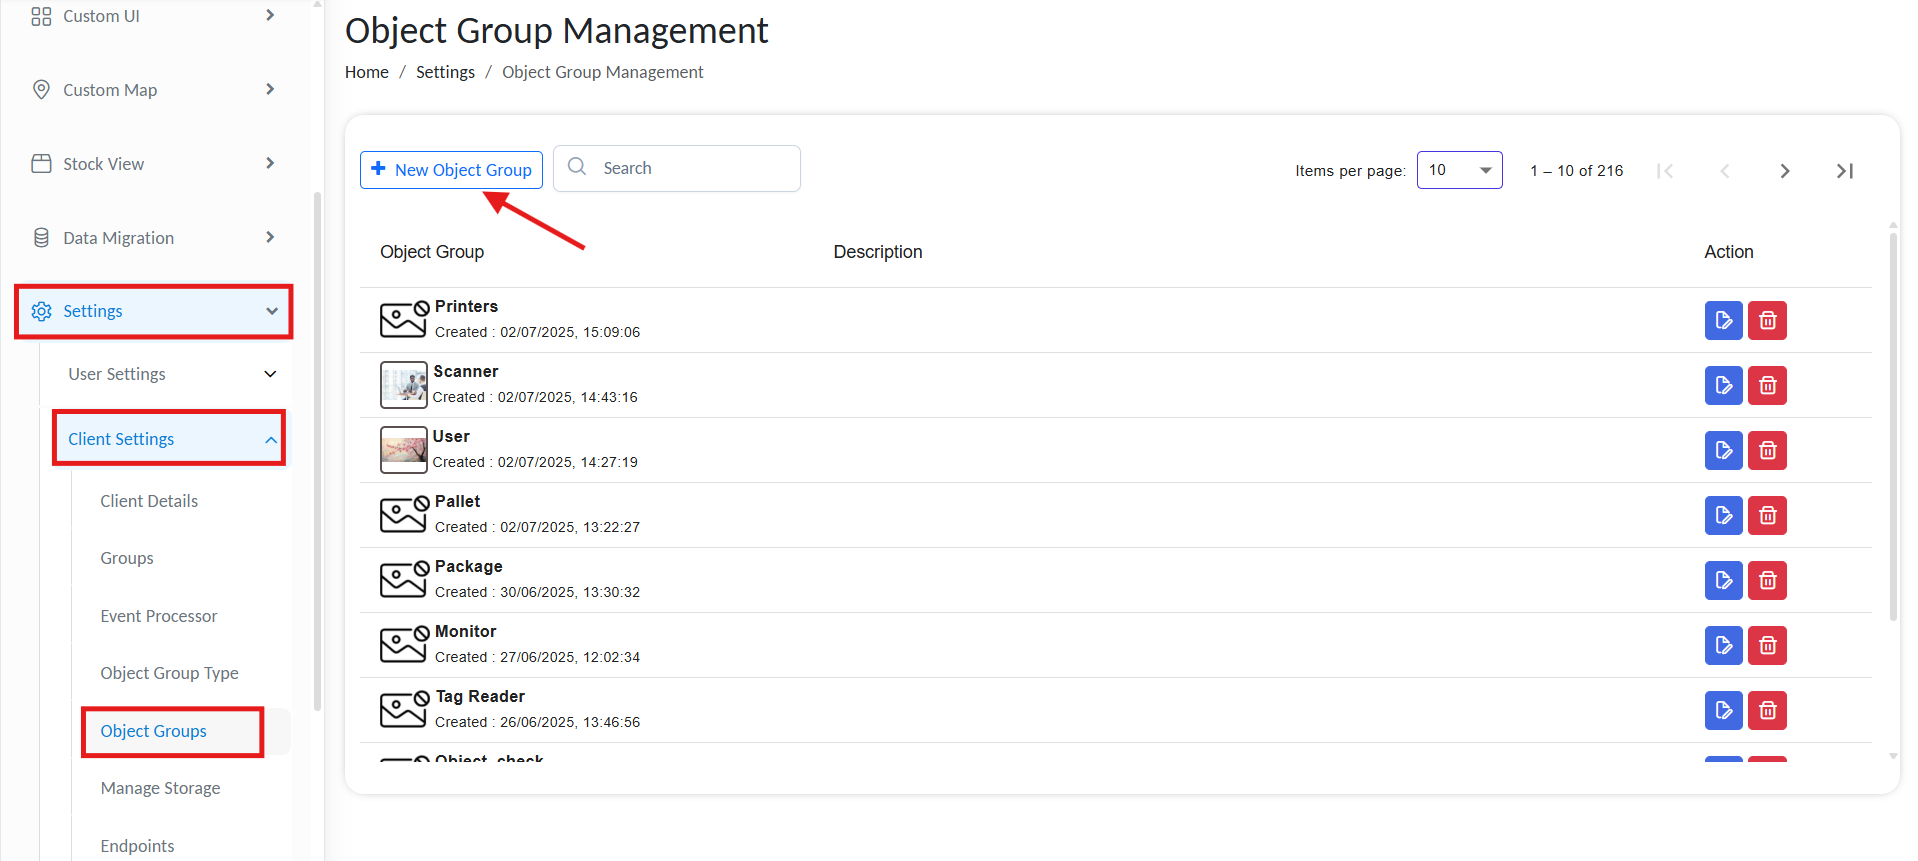
Create a new object group.
Step 2: Configure Basic Settings
Fill in the following fields when creating a new Object Group:
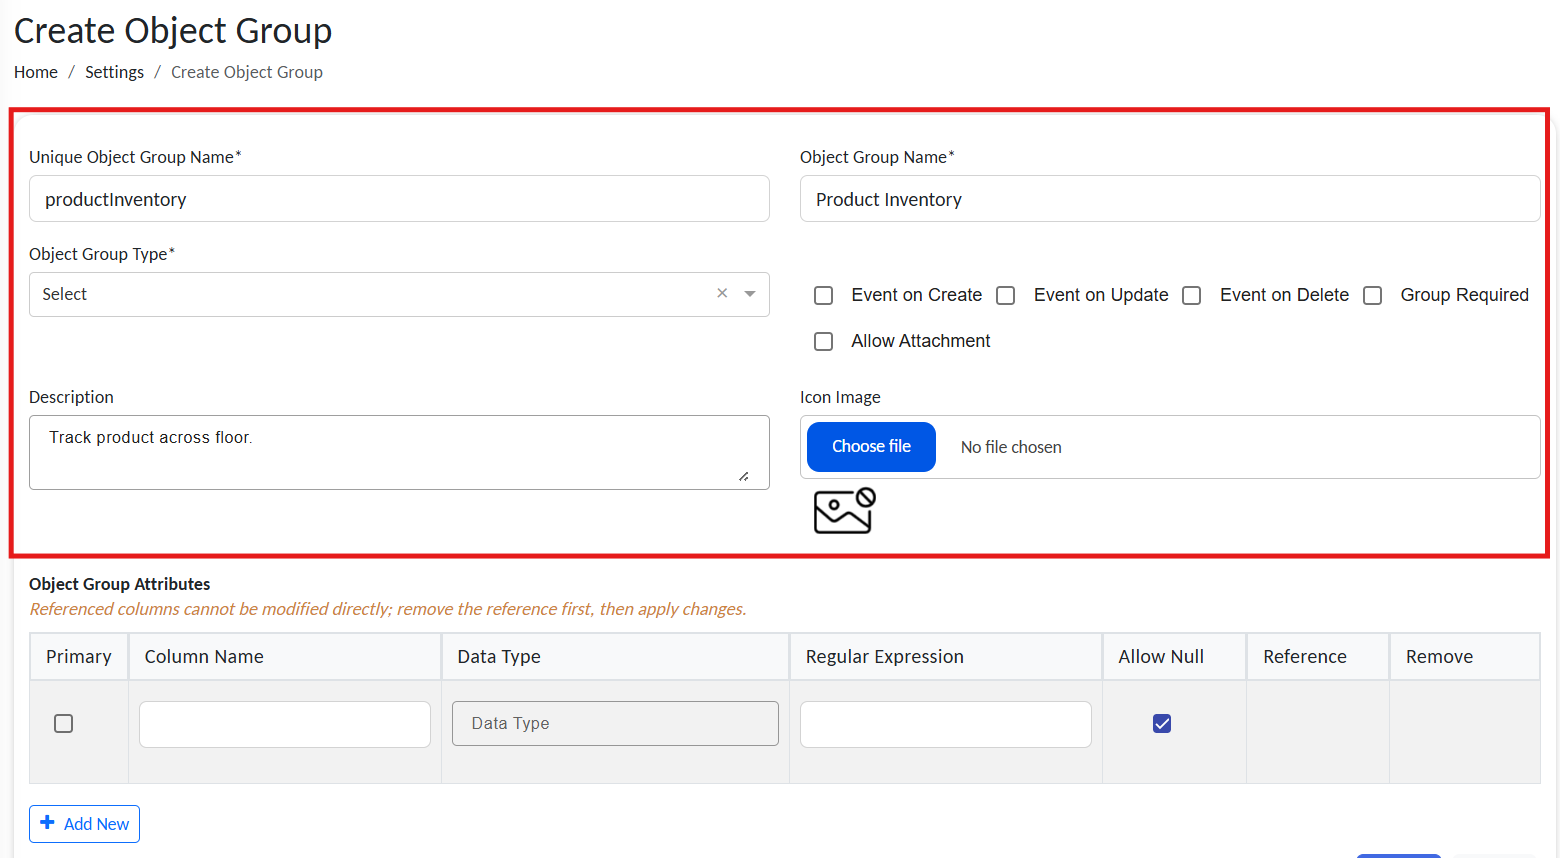
Set up basic object group informations.
| Setting | Description |
|---|---|
| Unique Object Group Name | Critical internal identifier for your Object Group within the RCOM Gateway server. It must be unique across your entire system. Best practice: Use camelCase or underscores (e.g., productInventory, patient_records). |
| Object Group Name (Display Name) | User-friendly name that will be displayed in the RCOM Gateway interface. It doesn't need to be unique and can contain spaces. Examples: Product Inventory, Medical Equipment List. |
| Object Group Type (Parent Group) | Organize Object Groups hierarchically by assigning a parent group. Example: Under Warehouse, include ProductInventory, LoadingDocks. |
| Trigger Event on Change | You can choose to automatically trigger a new event whenever an Object within this group is: - Created: A new record is added. - Updated: An existing record is modified. - Deleted: A record is removed. |
| Aditional Options | - Allow Attachment: Allow to add attachments when you create a new object from stock view. - Group Required: Once enabled, new object can't be created without a valid group selection |
| Description (Optional) | A small description about the Object Group. |
| Icon Image (Optional) | This icon will be displayed on the Object Group page within the Gateway, making it easier to visually identify different groups. |
Step 3: Define Object Attributes (Object Structure)
This is where you define the actual data fields (the Object Structure) that each Object in this group will have. You'll typically see a table where you can add and configure these attributes, similar to defining columns in a database table.
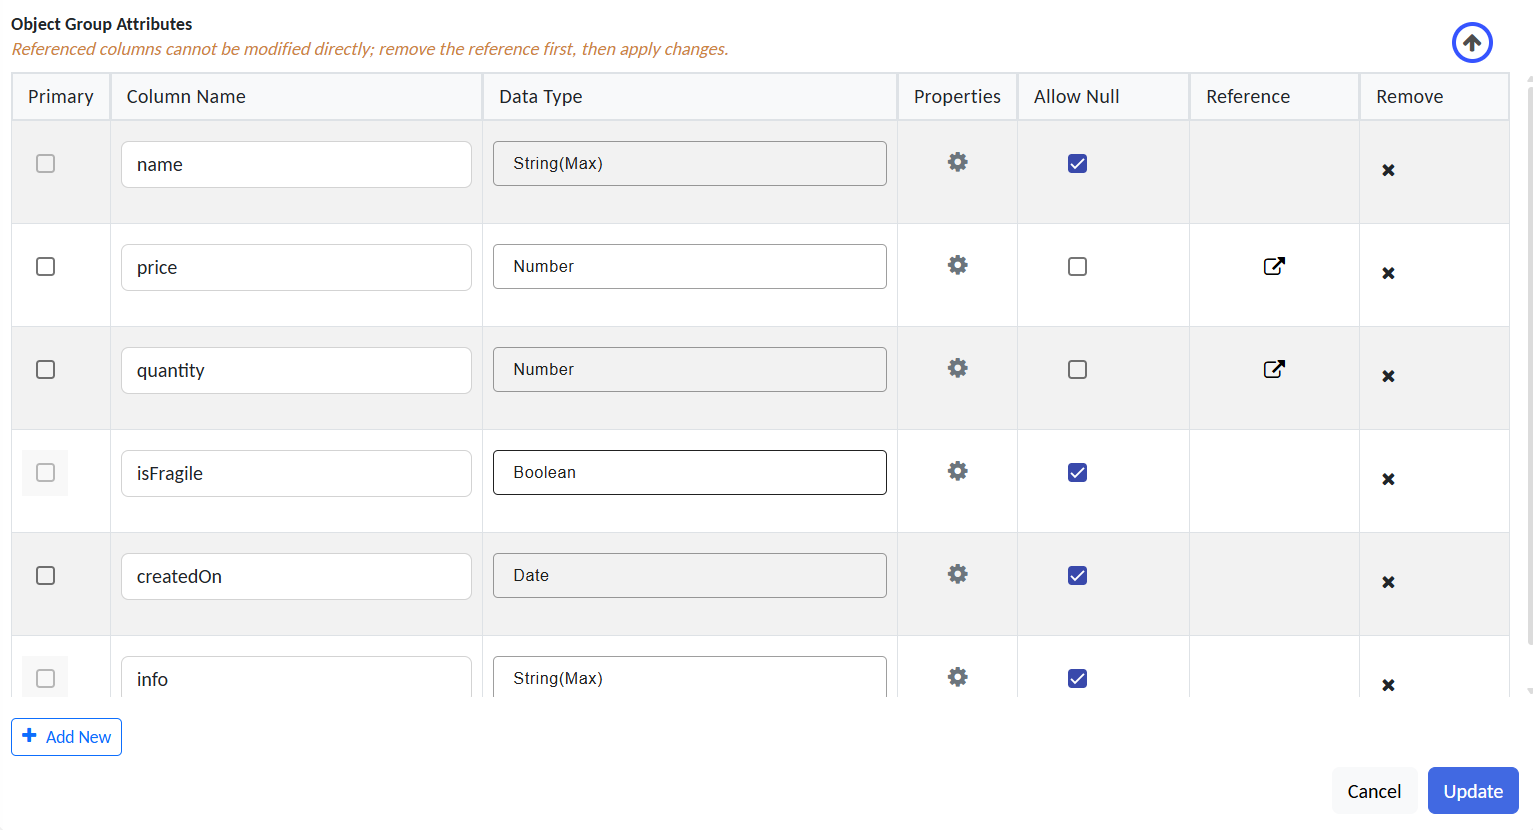
setting up object attributes.
Clcik on properties to get more configuration options.
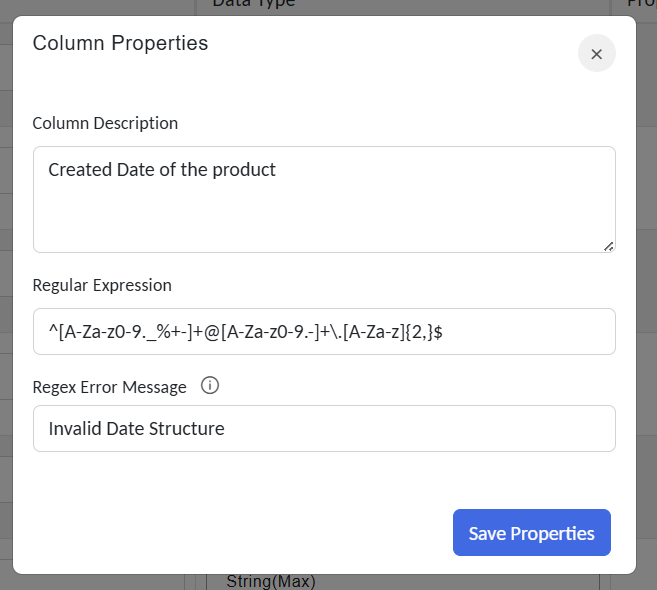
Attribute parameters configuration.
Each Object in your group will follow the structure defined here. Below are the configurable fields for each attribute:
| Field | Description |
|---|---|
| Primary | Marks the unique identifier for each Object (e.g., product_id, patient_id, EquipmentID).Only one attribute should be marked primary. |
| Column Name | Internal field name. Use lowercase, underscores, or camelCase. Avoid spaces or special characters. |
| Column Description | A short description of the column that helps users understand its purpose and content. This is for documentation and reference when working with the Object later. |
| Data Type | Specifies the kind of data the attribute holds: - Number: Whole numbers (e.g., quantity, count) - Decimal: Numbers with decimals (e.g., temperature, weight) - String (Max): Text fields with no character limit (e.g., long descriptions) - String (Limit): Text fields with a defined maximum length (e.g., short codes, IDs) - Date: Calendar dates (e.g., last updated, maintenance due) - Boolean: True/false values (e.g., isActive) - Guid: System-generated globally unique identifiers - Custom: Define and use a fixed set of allowed values |
| Regular expression | Enter a regular expression to define the pattern that validates user input |
| Regex Error Message | The message logged when the save operation fails due to a regex validation error. Accepts plain text or translation keys (e.g., ERROR.invalid_email). This helps provide meaningful feedback to users when data doesn't match the validation pattern. |
| Allow Null | Indicates whether the attribute can be left empty. Mark essential fields (like IDs) as non-nullable. |
| Reference (Optional) | Links this attribute to a field in another Object Group (similar to a foreign key). Example: assignedDepartmentID referencing DepartmentID in a Departments group. |
You can:
- Click Add New to define more attributes.
- Click the Remove (×) icon to delete an attribute.
Final Step: Save Your Object Group
Once you’ve defined the structure and settings:
- Review your configuration.
- Click Create (or Save) to finalize the Object Group.
Example: Creating a "Medical Equipment" Object Group
Goal
Track all medical devices in a hospital environment.
Navigation
Settings > Client Settings > Object Groups > New Object Group
Configuration
- Unique Object Group Name:
MedicalEquipment - Display Name: Medical Equipment
- Parent Group (optional):
HospitalAssets - Trigger Event on Change: Enabled for Update
- Icon: Upload a relevant equipment icon
Attributes
setting up object attributes.
Finalize
Click Create to save.