Create Custom UI
Overview
The Custom UI feature in RCOM Gateway enables administrators and developers to build fully functional web applications directly within the gateway environment.
A Custom UI consists of HTML, CSS, and JavaScript code served by the gateway and connected to the RCOM Gateway backend through REST APIs and MQTT topics. This allows organizations to build custom dashboards, control panels, operational portals, or complete business applications that interact with gateway workflows, objects, and devices.
Unlike traditional dashboards, Custom UI in RCOM Gateway functions as a front-end application layer, where the gateway acts as the backend service responsible for data processing, automation, event handling, and security.
This architecture allows you to build tailored user interfaces without deploying additional web infrastructure.
Typical use cases include:
- Warehouse operator portals
- Production monitoring dashboards
- Vendor interaction portals
- Asset tracking interfaces
- Control panels for industrial processes
- Custom workflow interaction interfaces
Custom UI Architecture
A Custom UI in RCOM Gateway operates as a web front-end connected to the gateway backend.
The interaction flow typically follows this model:
text
User Browser
      │
      ▼
Custom UI (HTML + CSS + JS)
      │
      ├── REST API Calls → <ProductName/> Endpoints
      │
      └── MQTT Subscriptions → Real-time updates
                              from workflows/events
In this architecture:
Frontend
- HTML defines the interface layout
- CSS handles styling
- JavaScript manages UI logic and API communication
Backend
- RCOM Gateway workflows process business logic
- Object Groups store persistent data
- Event Processors handle incoming events
- Endpoints expose APIs for UI communication
The gateway therefore acts as a secure backend platform for the UI.
Key Capabilities
The Custom UI system provides several advanced capabilities beyond simple dashboards.
Full Web Application Development
Developers can build complete front-end applications using standard web technologies.
Supported components include:
- HTML interfaces
- CSS styling
- JavaScript logic
- external libraries (Bootstrap, FontAwesome, etc.)
These applications can interact with gateway services such as:
- REST APIs
- Object Groups
- Workflows
- MQTT real-time messaging
This enables the development of full operational tools such as inventory portals, asset management systems, and monitoring interfaces.
Direct UI Access via Shareable Link
Each Custom UI can be accessed directly through a dedicated URL generated by the gateway.
This allows the interface to be opened in any browser without navigating through the gateway administration interface.
Typical usage scenarios include:
- Public dashboards
- Operator control panels
- customer portals
- kiosk displays
- large-screen monitoring dashboards
Users simply open the provided URL in a browser.
Authentication and Access Control
Custom UIs can either use gateway authentication or operate as public interfaces, depending on the security requirements.
Public Access (No Authentication)
A Custom UI can be configured to allow access without requiring gateway login credentials.
This is useful for:
- public dashboards
- display screens in production environments
- kiosks or information boards
- customer-facing monitoring screens
When enabled, the UI becomes accessible through its link without authentication.
However, backend APIs must still be secured appropriately.
Gateway Authentication
A Custom UI can also use the same authentication system used by RCOM Gateway.
When authentication is enabled:
- Users must log in before accessing the UI
- Gateway role-based permissions apply
- API calls automatically include user context
This provides several benefits:
- centralized security management
- role-based access control
- detailed audit tracking
- secure access to backend resources
Example Use Case
A company wants employees to access a custom operational dashboard but does not want them to access the gateway administration interface.
Solution:
- Create a new role with only Custom UI view permissions
- Assign this role to specific users
- Enable authentication on the Custom UI
Users can now access the UI securely without having access to the rest of the gateway.
User Identity in API Calls
When a Custom UI uses gateway authentication, every API request automatically contains the authenticated user identity.
This provides important operational advantages:
- Workflows know which user initiated an action
- Audit tracking becomes easier
- Actions can be logged per user
- Authorization logic can be implemented in workflows
This allows organizations to implement secure and traceable business processes.
Version Control
Every time a Custom UI is modified and saved, the gateway automatically creates a new version of that UI.
Benefits include:
- rollback capability
- safe experimentation with UI updates
- version history tracking
- easier debugging of UI changes
If a newly deployed version introduces issues, administrators can simply revert to a previous version with a single action.
Creating a Custom UI
Step 1: Open Custom UI Management
Navigate to:
Custom UI → Custom UI Management
This page lists all existing custom interfaces.
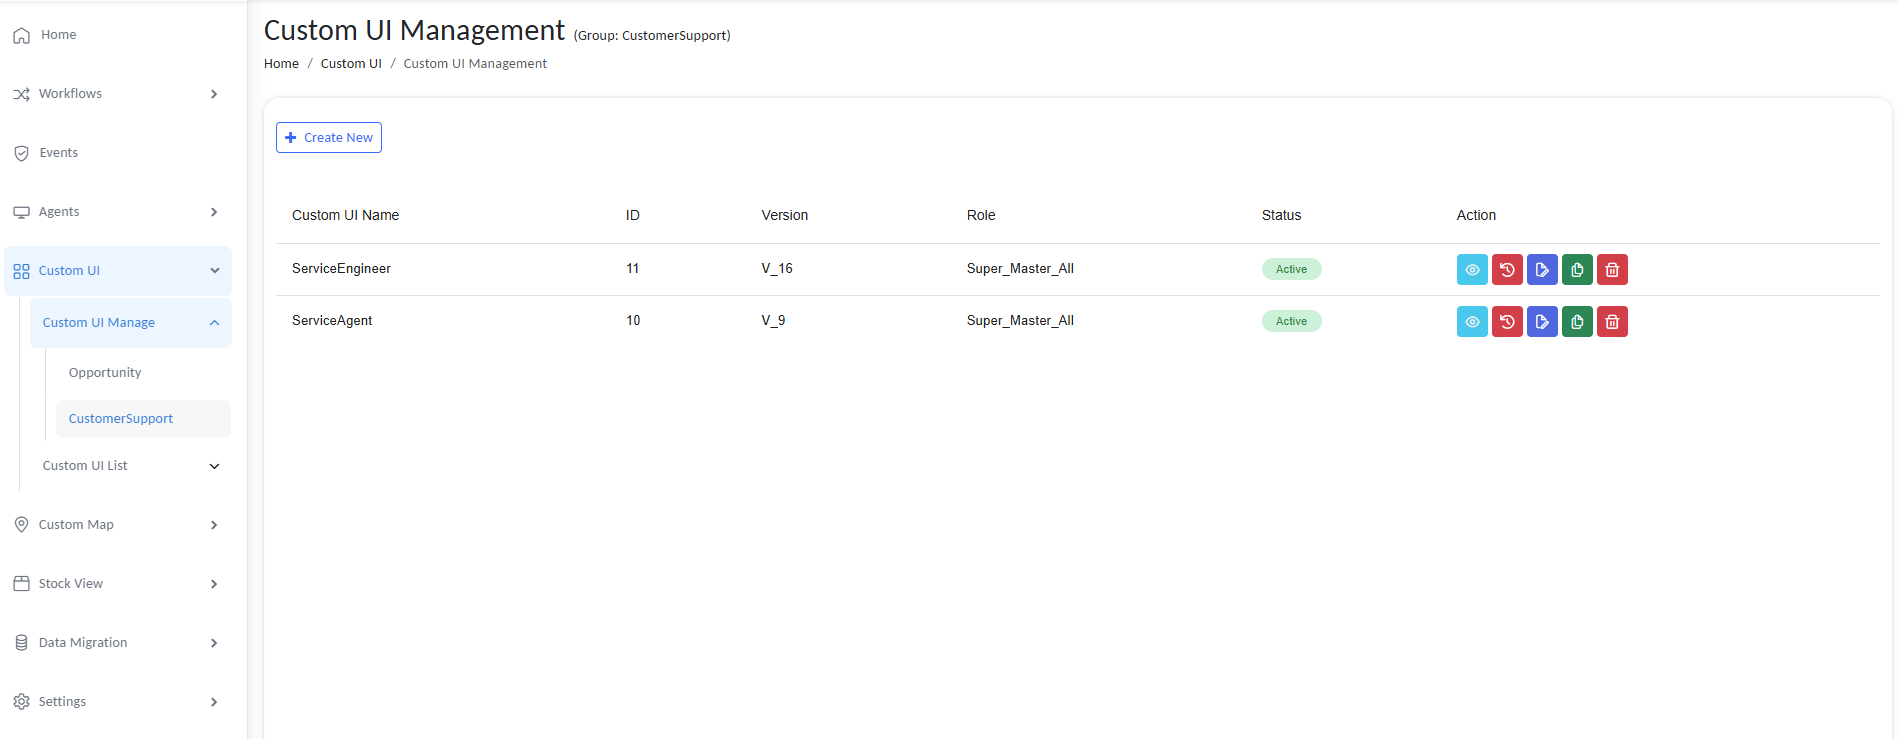
image 20260305 055226
The list shows:
- UI name
- ID
- version
- assigned roles
- status
- available actions
Administrators can preview, edit, copy, restore, or delete UIs from this page.
Step 2: Create a New UI
Click Create New.
You will be prompted to configure the basic UI settings.
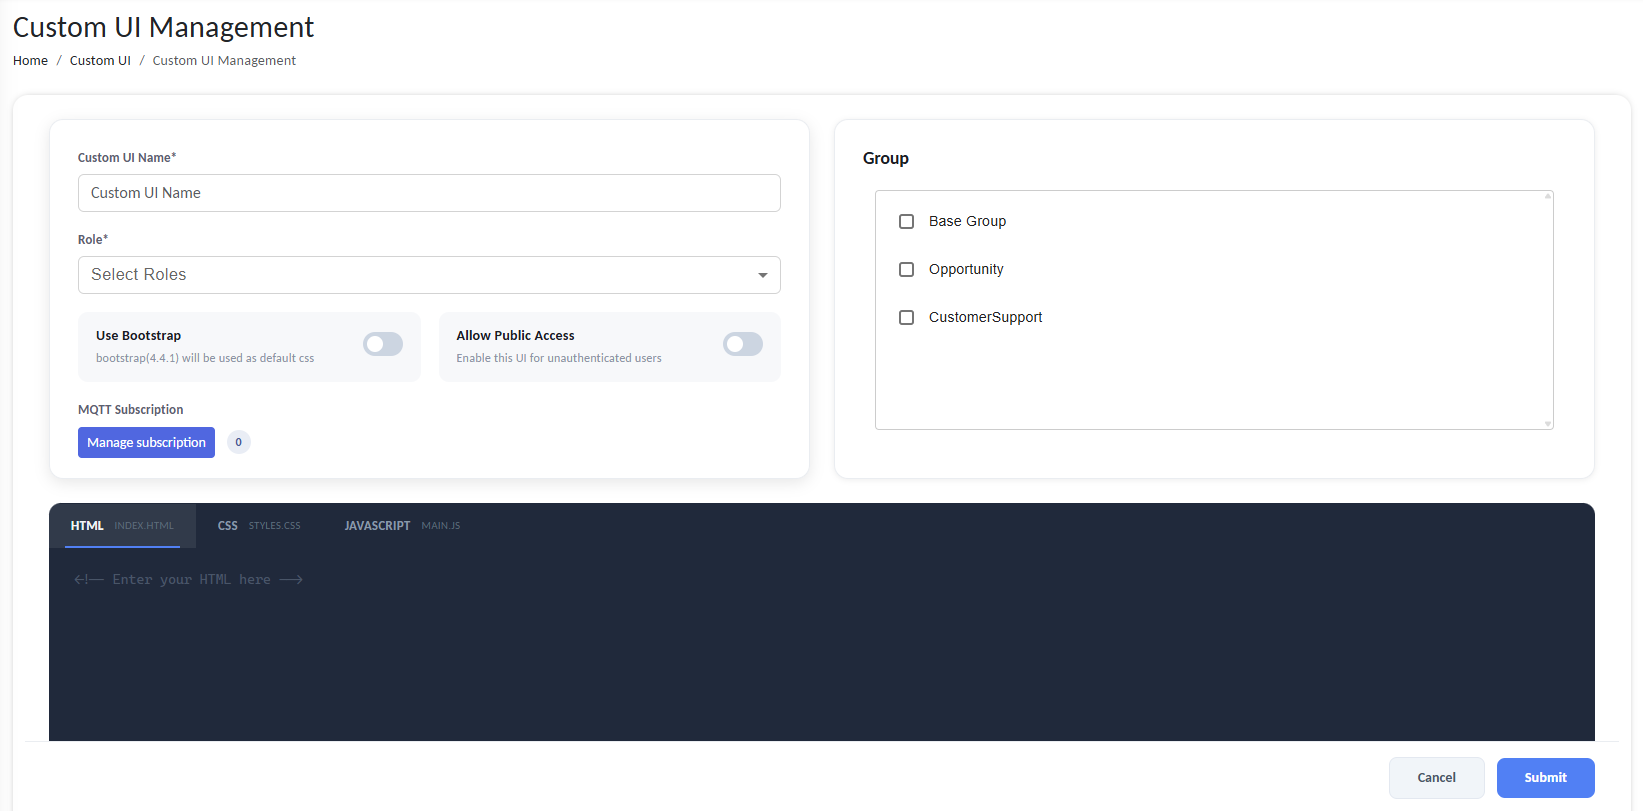
image 20260305 055333
Step 3: Configure Basic Settings
-
Custom UI Name
A human-friendly name used to identify the interface.
Example:
Warehouse Dashboard
Vendor Portal
Production Monitor -
Role Assignment
Defines which user roles are allowed to access the UI. This integrates with the gateway's role-based access control system.
-
Bootstrap Option
Optionally enables Bootstrap styling as the default CSS framework.
This simplifies UI development by providing prebuilt layout components.
-
Allow Public Access
If enabled, the UI can be accessed without authentication.
Use this only when authentication is not required.
-
Group Assignment
The UI can be associated with specific access groups.
This controls visibility and organizational scoping.
Step 4: Writing the UI Code
Each Custom UI includes three main code sections.
HTML
Defines the structure of the interface.
html
<div class="container">
    <h2>Inventory Dashboard</h2>
    <table id="inventoryTable"></table>
</div>
CSS
Controls visual appearance.
css
.container {
    padding: 20px;
    font-family: Arial;
}
JavaScript
Handles interaction logic and backend communication.
Example tasks handled in JavaScript:
- API calls
- UI updates
- MQTT message processing
- user interaction logic
Example:
javascript
function initializeEngineerFilters() {
  // Add event listeners for filters
  const searchFilter = document.getElementById('searchFilterEngineer');
  const statusFilter = document.getElementById('statusFilterEngineer');
  const clearFiltersBtn = document.getElementById('clearFiltersEngineerBtn');
  if (searchFilter) {
    searchFilter.addEventListener('input', () => {
      renderAssignedTickets();
    });
  }
}
Backend Communication
Custom UIs communicate with the gateway backend through two mechanisms.
REST API
REST APIs allow the UI to send or request data from the gateway.
Typical use cases:
- submitting forms
- querying object data
- triggering workflows
- updating system states
Example API request:
javascript
fetch("http://<your_domain>/<ProductName/>ENDPOINTAPI/cui/get", {
  method: "GET",
  headers: { "Content-Type": "application/json" }
})
.then(res => res.json())
.then(data => {
  console.log(data);
});
REST APIs are typically handled by:
- Endpoints
- Event Processors
- Workflows
MQTT for Real-Time Updates
For real-time data updates, Custom UIs can subscribe to MQTT topics.
Workflows can publish updates using the MQTT Publisher action.
The UI receives these messages instantly.
Example use cases:
- live sensor dashboards
- asset tracking
- production monitoring
- alert notifications
Setting up MQTT in Custom UI
Click Manage Subscription → Add New
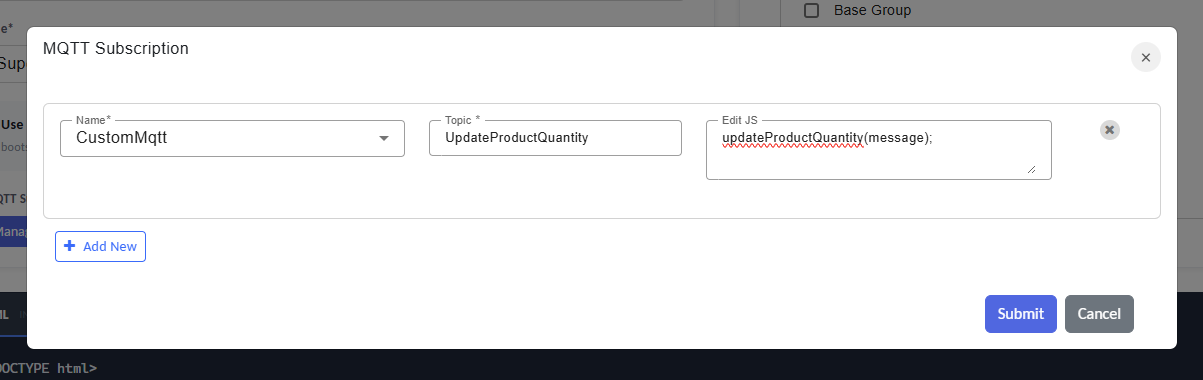
Configure MQTT Connection
Enter a name and topic.
In the JS editor for the mqtt connection, use the message variable (predefined) to access incoming data.
Example processing code:
javascript
function updateProductQuantity(message) {
  const data = JSON.parse(message);
  const quantity = data.quantity ?? 0;
  document.getElementById("product_quantity").textContent = quantity;
}
// Make sure to invoke the function to fetch the data
updateProductQuantity(message);
Whenever a new MQTT message arrives, the UI can be updated immediately based on the configuration.
Custom Permissions in UI Components
RCOM Gateway allows you to define custom permissions that can be assigned to roles. These permissions can then be used in custom UI implementations to control which actions or components are available to a user.
When building custom UI pages, you can check whether the currently logged-in user has a specific permission and dynamically show, hide, enable, or disable UI components accordingly.
How It Works
- Assign custom permission permission to one or more roles.
- In your custom UI logic, check whether the current user has the required permission.
- Based on the result, control the visibility or availability of UI components.
Example Scenario
Suppose you have a custom UI used by two roles:
- Floor Manager
- Inventory Manager
You define custom permissions such as:
DELETERESET
These permissions are assigned only to roles that are allowed to perform those actions.
In the UI:
- All users can access the general interface.
- Actions such as Delete or Reset are only available if the logged-in user has the corresponding permission.
Example HTML
<div>
  <p>Welcome! This section is visible to everyone.</p>
</div>

<button id="delete-btn-top" style="display: none;">Delete</button>
<button id="reset-btn-top" style="display: none;">Reset</button>
Example JavaScript
The following example checks whether the logged-in user has specific permissions and updates the UI accordingly.
function checkPermissions() {
    const items = ['DELETE', 'RESET'];

    for (const item of items) {
        const params = new URLSearchParams({
            key: item,
            username: userName
        });

        fetch(`${API_URL}/api/roles/check_permission?${params.toString()}`, {
            method: 'GET',
        })
            .then(response => response.json())
            .then(data => {
                if (!data) {
                    if (item === 'DELETE') {
                        const deleteButton = document.getElementById("delete-btn-top");
                        if (deleteButton) {
                            deleteButton.style.display = 'none';
                        }
                    } else if (item === 'RESET') {
                        const resetButton = document.getElementById("reset-btn-top");
                        if (resetButton) {
                            resetButton.style.display = 'none';
                        }
                    }
                } else {
                    if (item === 'DELETE') {
                        const deleteButton = document.getElementById("delete-btn-top");
                        if (deleteButton) {
                            deleteButton.style.display = 'block';
                        }
                        isDelete = true;
                    } else if (item === 'RESET') {
                        const resetButton = document.getElementById("reset-btn-top");
                        if (resetButton) {
                            resetButton.style.display = 'block';
                        }
                        isReset = true;
                    }
                }

                return data;
            })
            .catch(error => {
                console.error("Error fetching permissions data:", error);
                return null;
            });
    }
}
Behavior
In this example:
- The Delete and Reset buttons are initially hidden.
- The
checkPermissions()function verifies whether the user has theDELETEandRESETpermissions. - If the permission is granted, the corresponding button becomes visible.
- If the permission is not granted, the button remains hidden.
This approach allows custom UI pages to dynamically adjust available actions based on the permissions assigned to the user's role.
Assign custom permissions to roles:
- Go to
Settings > Roles & Permissions > Roles - Click
+ Add New Roleor choose to edit an existing Role
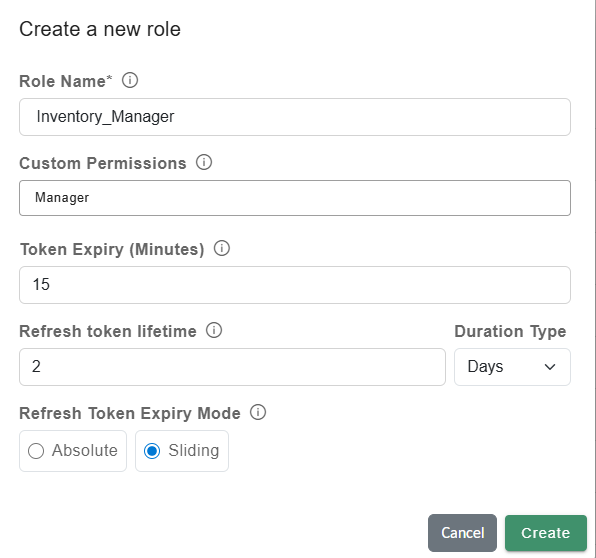
Configure Custom Permissions
- Enter Role Name (e.g., Inventory_Manager, Line_Supervisor) (if new role)
- Assign a Custom Permission
- Click on
Create/Update
Best Practices & Tips
- Always test API and MQTT connectivity with sample data before deploying to users.
- Restrict access using Access Groups for security; only assigned users can see or edit specific UIs.
- Use tooltips and field labels for clarity if your UI is complex or used by non-technical staff.
- Structure your JS, separate logic for API, UI updates, and event handlers for easier maintenance.