Register, Install, and Manage Agents with RCOM Gateway
RCOM Agents are lightweight edge-side software components that connect Auto-ID and IoT devices to the RCOM Gateway or to other custom middleware systems. They collect, filter, normalize, and securely forward real-time device data - RFID reads, barcode scans, BLE signals, vision events, sensor values, and more - into the Gateway or any other selected systems for event-driven automation.
Beyond data transfer, Agents are centrally managed through the RCOM Gateway. Administrators can register agents, configure them, deploy updates, monitor performance, and control edge operations across multiple sites - all from a single interface.
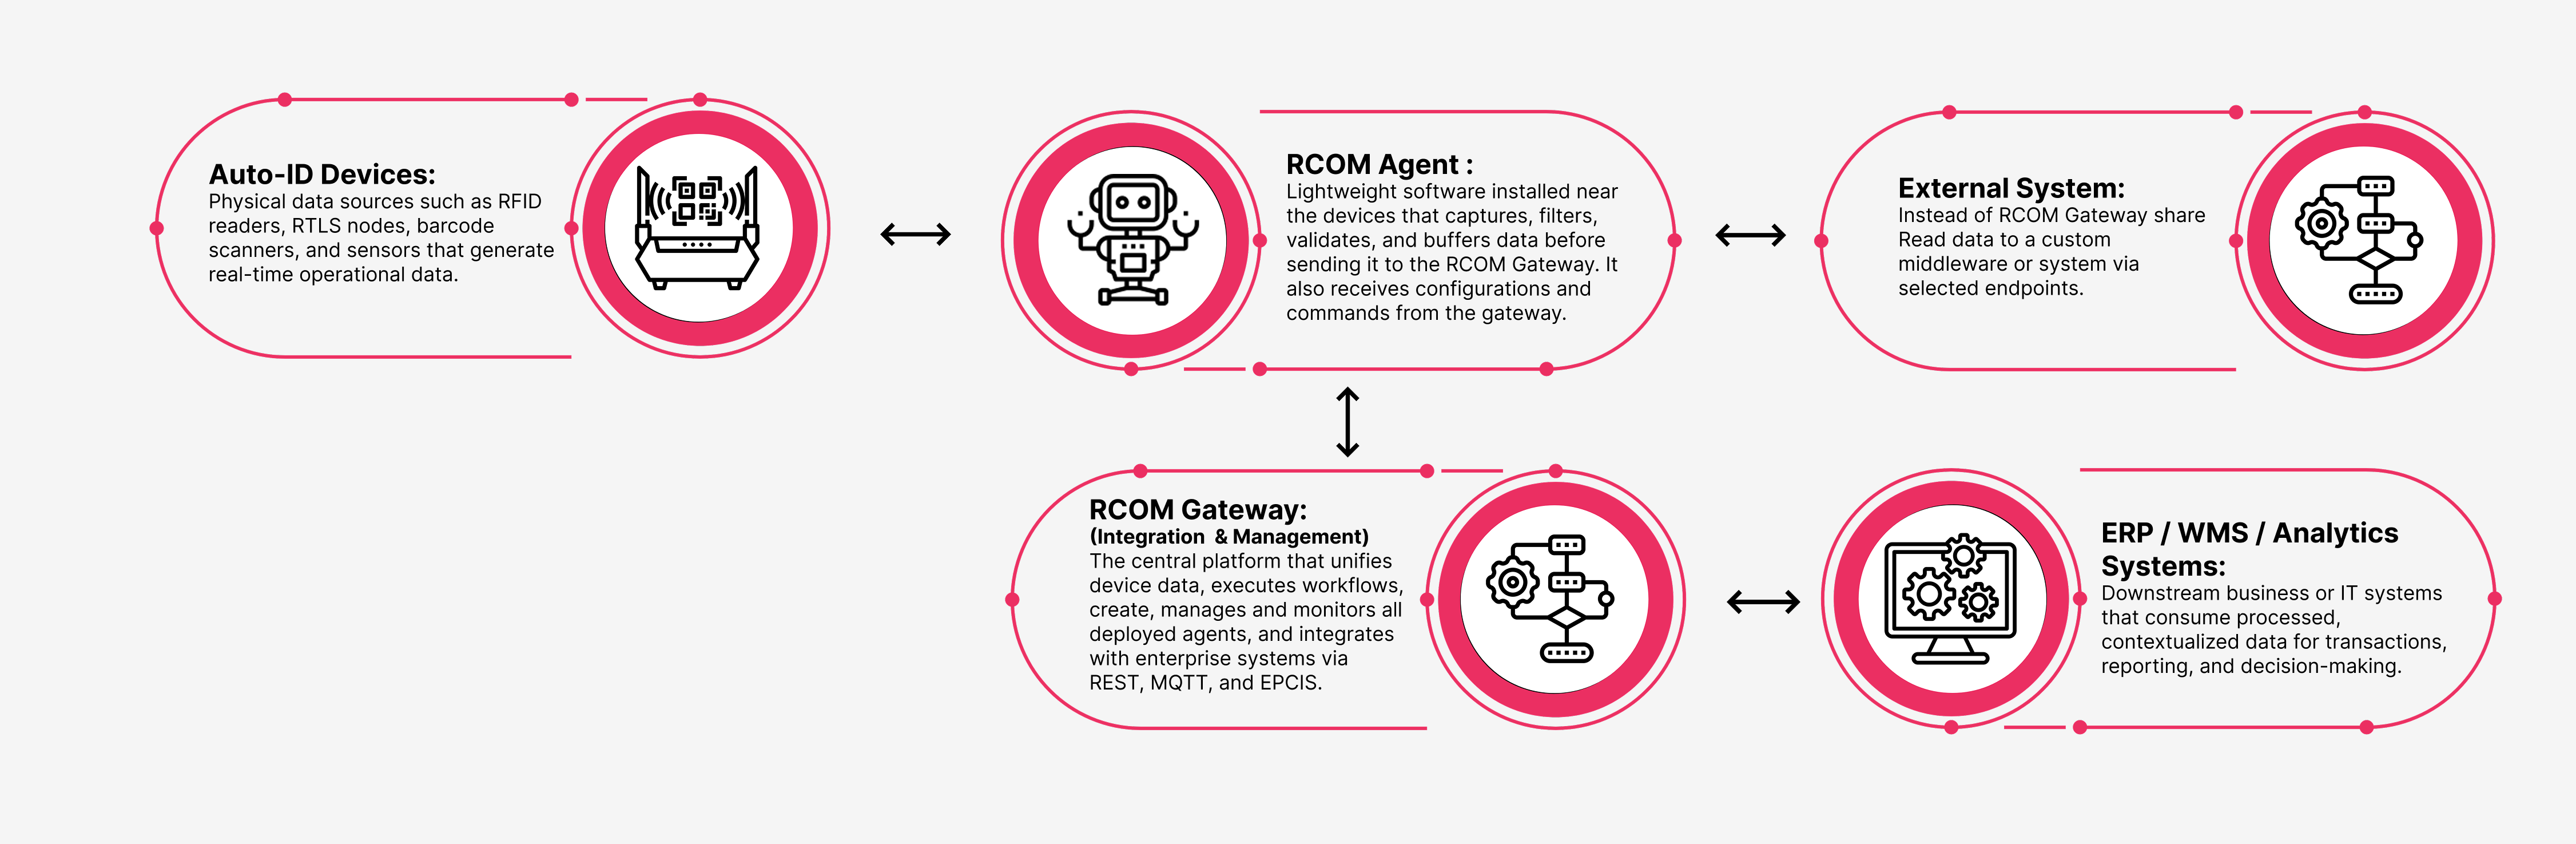
Agent architecture diagram
Accessing Agent Management
From the RCOM Gateway dashboard:
Agents → Manage Agents
This opens the Agent List, a searchable table of all registered agents and their key details.
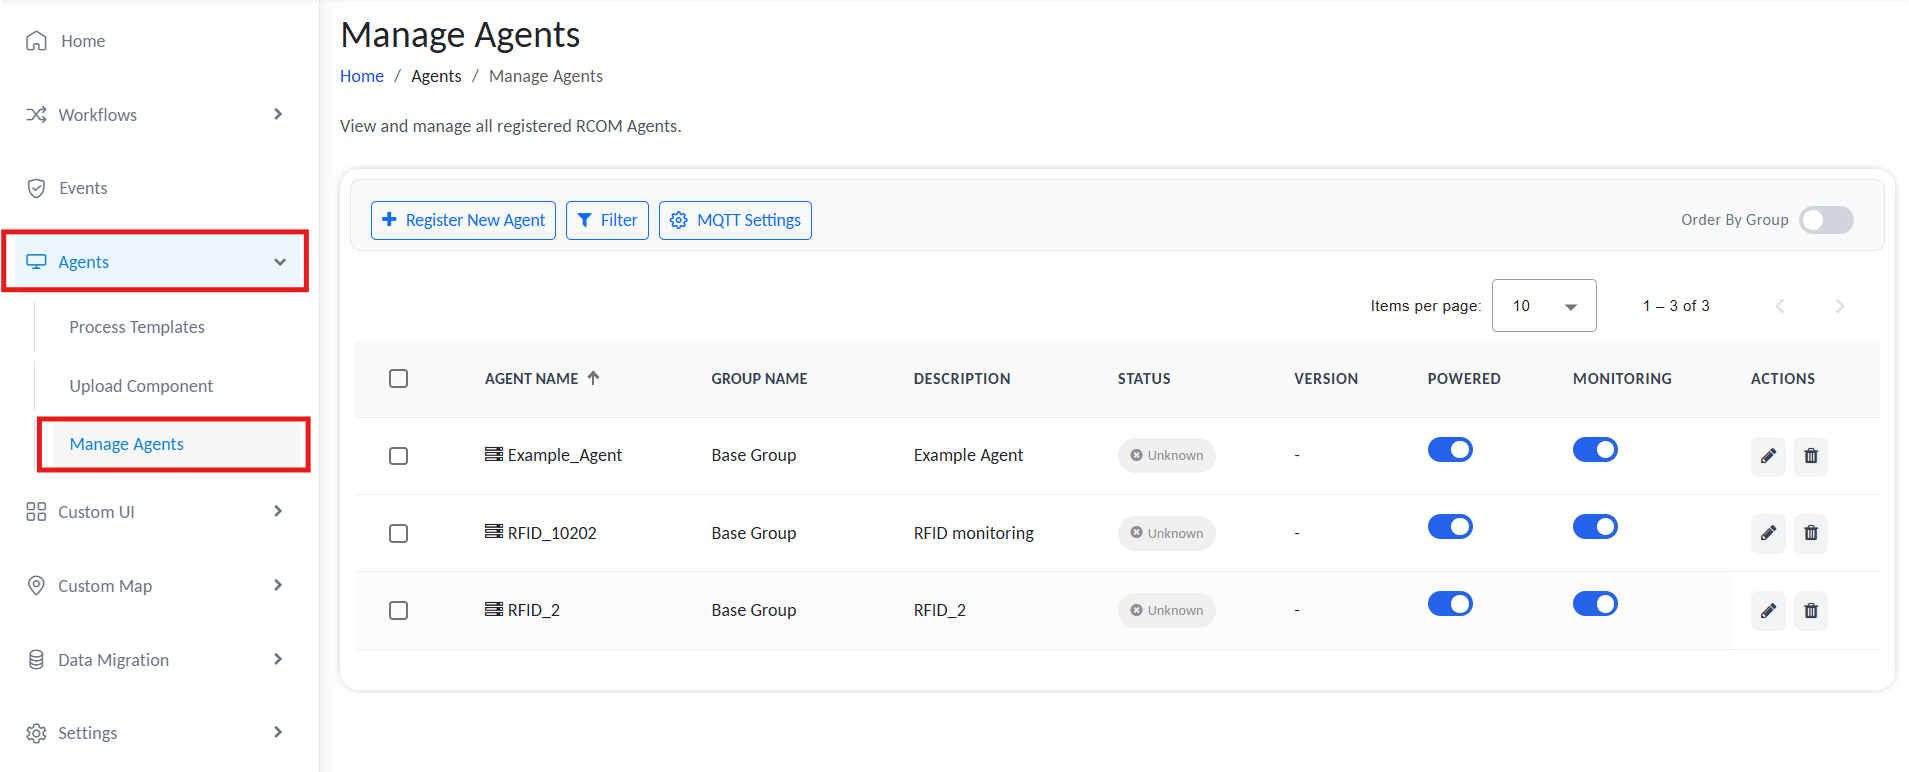
Manage Agents
Contents of the table:
| Column | Description |
|---|---|
| Agent Name | Human‑readable unique identifier for the agent. |
| Group Name | The Access Group assigned to the agent - only members of this group can view or manage it. |
| Description | A short summary of what the agent does or where it operates. |
| Status | The current connectivity and runtime state of the agent.
|
| Version | Installed version of the agent Edgeware. |
| Powered | Toggles whether the agent is active. When disabled, incoming tag reads will not be processed by the agent. |
| Monitoring | Enables/disables live monitoring. Data is still processed even if monitoring is off and is saved in the local DB; you won’t get any logs on the operation on the server side. |
| Actions | View, edit, or delete an agent. |
Agent Management Actions
- Register New Agent – Register a new agent in the Gateway
- Filter – Filter by status, group, or version
- MQTT Settings – Configure the MQTT broker details to which the gateway will post data, such as configuration updates.
- Per‑Agent Controls – Open details, modify configuration, or remove an agent
Create New Agent
Setting up an agent involves three key stages:
- Register the agent in the Gateway
- Configure connection and operational settings
- Link Processes that define agent‑side execution
Step 1: Register New Agent
- Click Register New Agent.
- Provide:
- Agent Name – Human‑readable and unique in your tenant.
- Agent Description – Purpose or deployment site.
- Group – Access group responsible for management. Only users assigned to the group can view or manage the agent.
- Click Create.
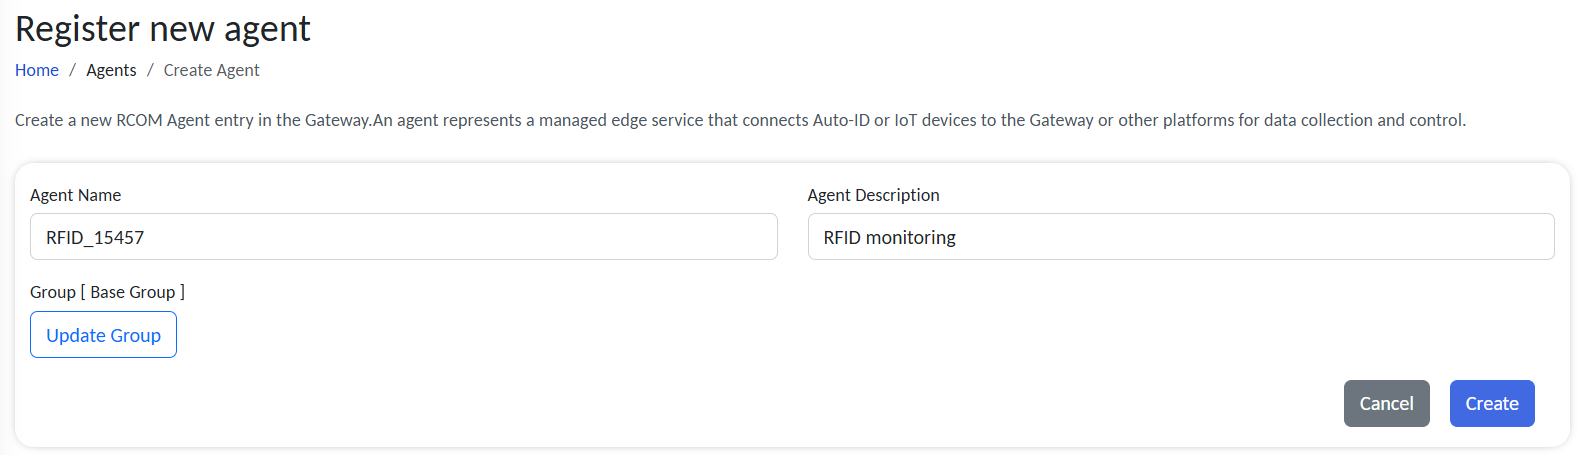
Register New Agent
Result:
A new agent record appears in the Gateway. This record represents the agent’s identity and is ready to receive configuration and updates.
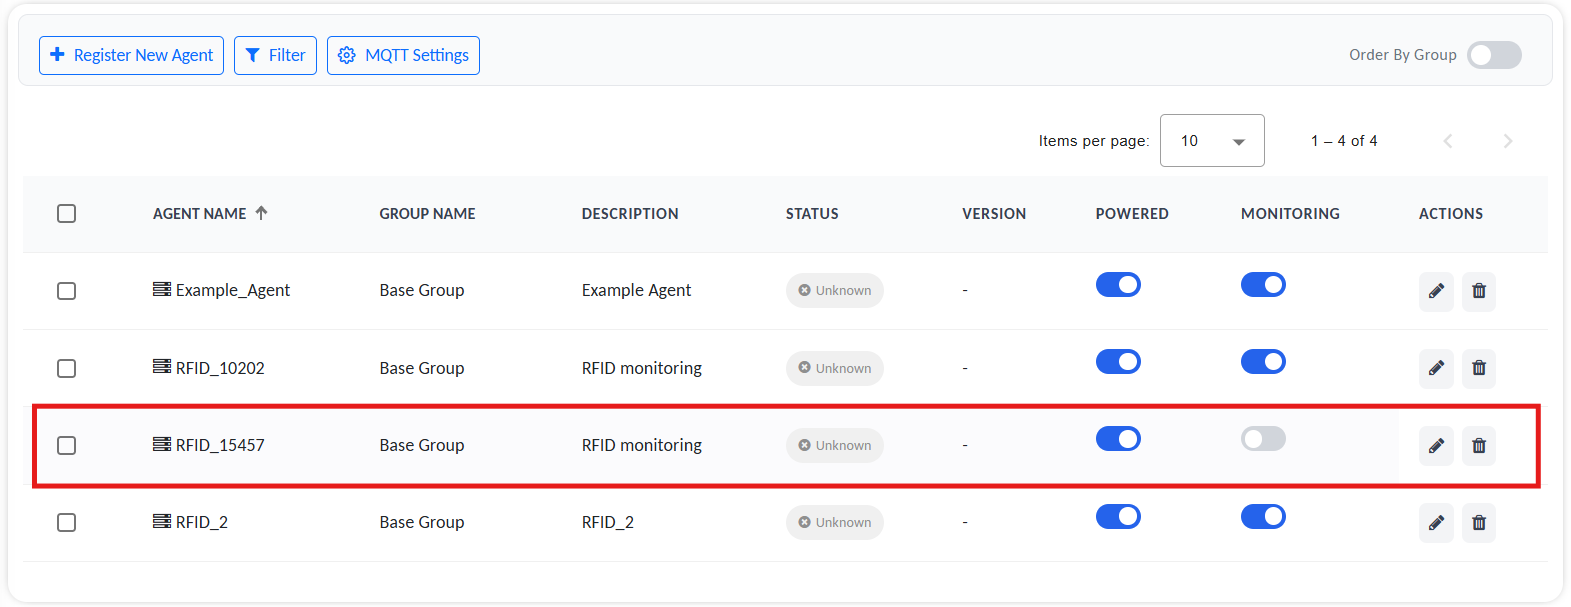
New registered Agent
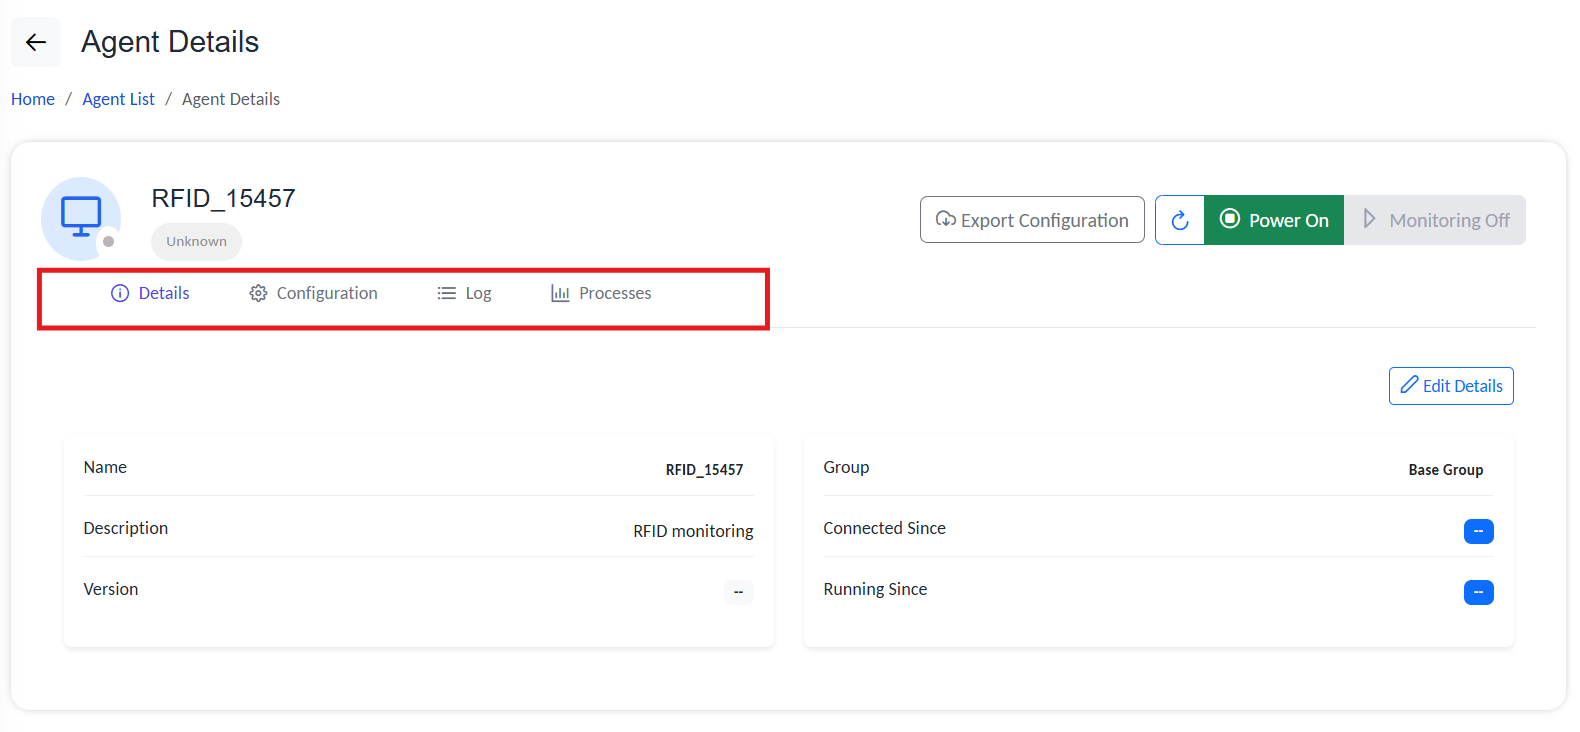
Step 2: Configure the Agent
As the agent is registered, click on the agent edit button to open Agent Details. The interface includes four tabs:
- Details – Basic metadata such as name, group, timestamps, and status.
- Configuration – Core and communication parameters.
- Log – Operational and diagnostic logs.
- Processes – The list of edge‑side tasks the agent executes.
To set up the agent, head to the Configuration tab.
Configure Agent
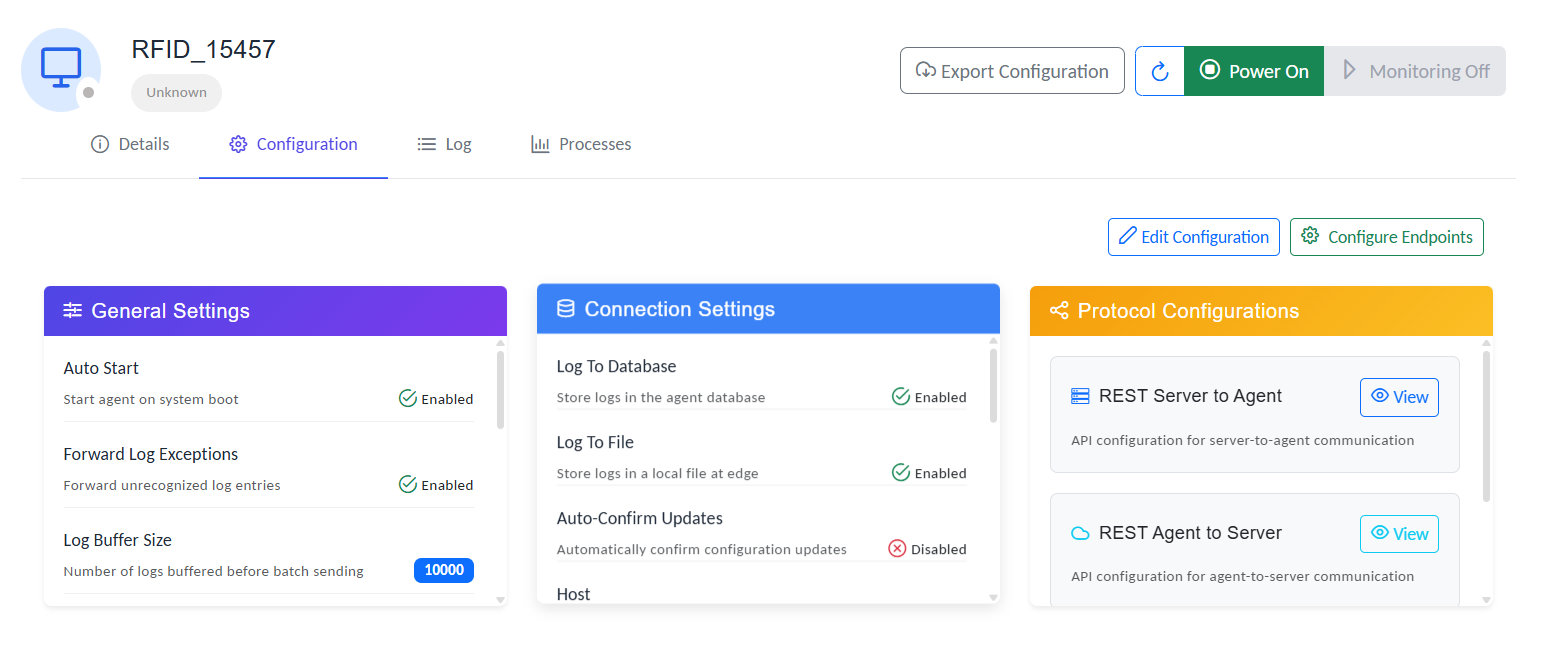
Configuration Tab
Under Configuration settings, you have general settings, connection settings, and protocol configuration.
Use Edit Configuration to modify parameters.
Configuration tab
Configuration settings are grouped into three main sections:
General Settings
| Setting | Description |
|---|---|
| Auto Start | The agent service automatically starts when the edge host boots. Recommended for production deployments to maintain continuous connectivity. |
| Forward Log Exceptions | Forwards unrecognized log entries to the Gateway for review. Log exceptions will be marked with a Red exclamation mark. Click on the icon to get a detailed report from the agent. |
| Log Buffer Size | How many log records are stored locally before being sent to the Gateway in one transmission cycle. A higher value reduces transmission frequency but increases memory usage. |
| Live Log Buffer Size | How many live log events are cached before being pushed to the Gateway in real-time monitoring mode. |
| Status Heartbeat Interval (ms) | Time interval, in milliseconds, between agent heartbeat messages sent to the Gateway. Lower values increase update frequency but consume more network bandwidth. |
| Log Batch Send Interval (ms) | How often the agent sends batched log data to the Gateway. Adjust based on network performance and log volume. |
| Live Log Push Interval (ms) | How frequently the agent pushes live log events to the Gateway when monitoring is active. |
| Live Log Inactivity Timeout (s) | How long the live log stream remains active without activity before timing out automatically. |
| Last Changed At | Timestamp of the most recent configuration update. |
Here is how a log exception will look like in the logs.

log exception
Connection Settings
| Setting | Description |
|---|---|
| Log to Database | Agent logs are stored in the local database on the edge host for analysis and audit retention. Recommended when offline operation or local troubleshooting is required. |
| Log to File | Saves log entries to local log files on the agent host for offline review or debugging. Useful in environments with intermittent connectivity. |
| Auto Confirm Update | Without any confirmation, automatically apply updates when the configurations are changed. |
| Host | Gateway host or server URL that the agent connects to for data exchange, configuration updates, and monitoring. |
| Log Display Level | Verbosity level: Logs of the selected type and higher will be listed; others will be ignored. Levels:
For example, selecting INFO will display logs tagged INFO, WARNING, ERROR, and SEVERE; others will be ignored. |
| Agent Connection Mode | Transport protocol between the agent and server
|
| Database Log Retention Days | How long logs are kept in the local database before automatic cleanup. Helps control storage usage. |
| Monitoring Worker Sleep (ms) | Time delay between background monitoring cycles. Lower values provide faster status detection but increase CPU usage. |
| Monitoring Payload Size Limit(bytes) | Specifies the maximum payload size (in bytes) for each log or monitoring data batch sent to the Gateway. |
Protocol Configuration
This section defines how the Agent communicates with the RCOM Gateway Gateway.
MQTT Configuration
MQTT provides real-time, lightweight communication between the Agent and the RCOM Gateway.
| Setting | Description | Example |
|---|---|---|
| Host | Defines the Gateway server URL for agent communication. | demo.rcom-gateway.example |
| Port | MQTT broker port. | 1883 |
| User Name | MQTT username used to authenticate to the broker. | demo-mqtt-user |
| Password | MQTT password used to authenticate to the broker. | ******** |
| Use TLS | Enables TLS encryption for the MQTT connection. | (enabled/disabled) |
| Root Topic | Topic prefix used by the Agent (all topics are created under this prefix). | demo/agents/agent-01 |
| Accept All Certificates | Allows all SSL/TLS certificates, including self-signed certificates. Use only for testing. | (enabled/disabled) |
| TLS Client Certificate Path | File path for the client certificate (mutual TLS). | C:\\Demo\\certs\\mqtt-client.pfx |
| TLS Client Certificate Password | Password for the client certificate file (if any). | ******** |
| TLS CA Certificate Path | Path to the CA certificate used to verify the broker certificate. | C:\\Demo\\certs\\ca.crt |
| Keep-Alive Interval (sec) | How often the Agent sends keep-alive pings to the broker. | 60 |
| Reconnect Interval (sec) | Delay before retrying connection after a disconnect. | (configure as needed) |
For high-volume environments, prefer MQTT with QoS 1 and tune Keep-Alive Interval + Reconnect Interval to match network stability.
REST Server → Agent Config
This configuration is used when the Gateway calls the Agent (server-to-agent) to retrieve status and push configuration/commands.
| Setting | Description | Example |
|---|---|---|
| API URL | Base API URL for the Agent runtime. | http://demo-agent.local:8080 |
| Authentication Type | Authentication method for API access. | None |
| User | API user (only required if auth is enabled). | -- |
| Password | API password (only required if auth is enabled). | -- |
| Agent check-in interval (ms) | Time interval (ms) at which the Gateway calls the Agent check-in endpoint to retrieve status. | 150000 |
REST Agent → Server Config
Agent-to-Server REST configuration is not enabled for RCOM Gateway yet.
Step 3: Add Agent Processes
Processes/Process Template
Processes define the operations an agent executes at the Edgeware level. RCOM Gateway simplifies creating process flows with its no-code workflow structure. Design agent operations by dragging and dropping available operation modules into a workflow.
After creating a workflow template, add it under the Processes tab to enable the agent to execute the selected process at Edgeware.
A single agent can run multiple processes, and one process template can be shared across multiple agents.
Agents run one or more Processes, which are portable, versioned units managing key tasks such as connecting to readers, parsing scans, applying filters, and emitting events.
Adding a Process
- In Agent Details → Processes, click Add Process.
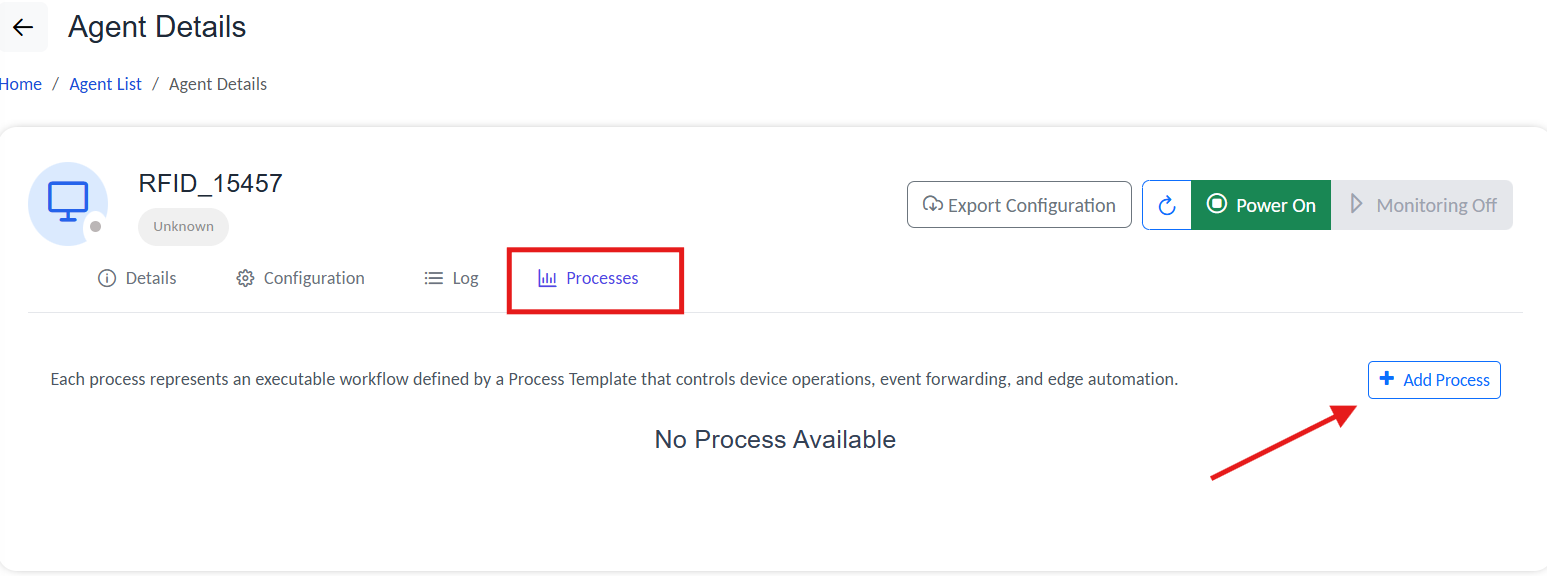
Interface to add new process to agent.
- Name the process.
- Pick a Process Template and the version of the template you want to use.
To know more about how to create a Process Template, refer to:
- Toggle Auto Start if the process should launch with the agent.

Enable Auto Start during process setup
- Create, then use the per-process actions to:
- Start/Stop the process
- Edit parameters (device IPs, topics, filters)
- Delete when decommissioning
- Monitor operations
- Get logs
Use Agents > Process Templates (left nav) to define reusable blueprints.
To know more about how to create and configure process templates refer to:
Manage Process
To customize and configure your associated process, open the details page for one of the linked processes.

List of configured processes
In the process details page, you have 4 tabs:
- Details – This section include basic process details, such as process name, template name, running status, and update information along with option to override any varibles defined from the process template configuration so that this instance of the process can use a different variables.
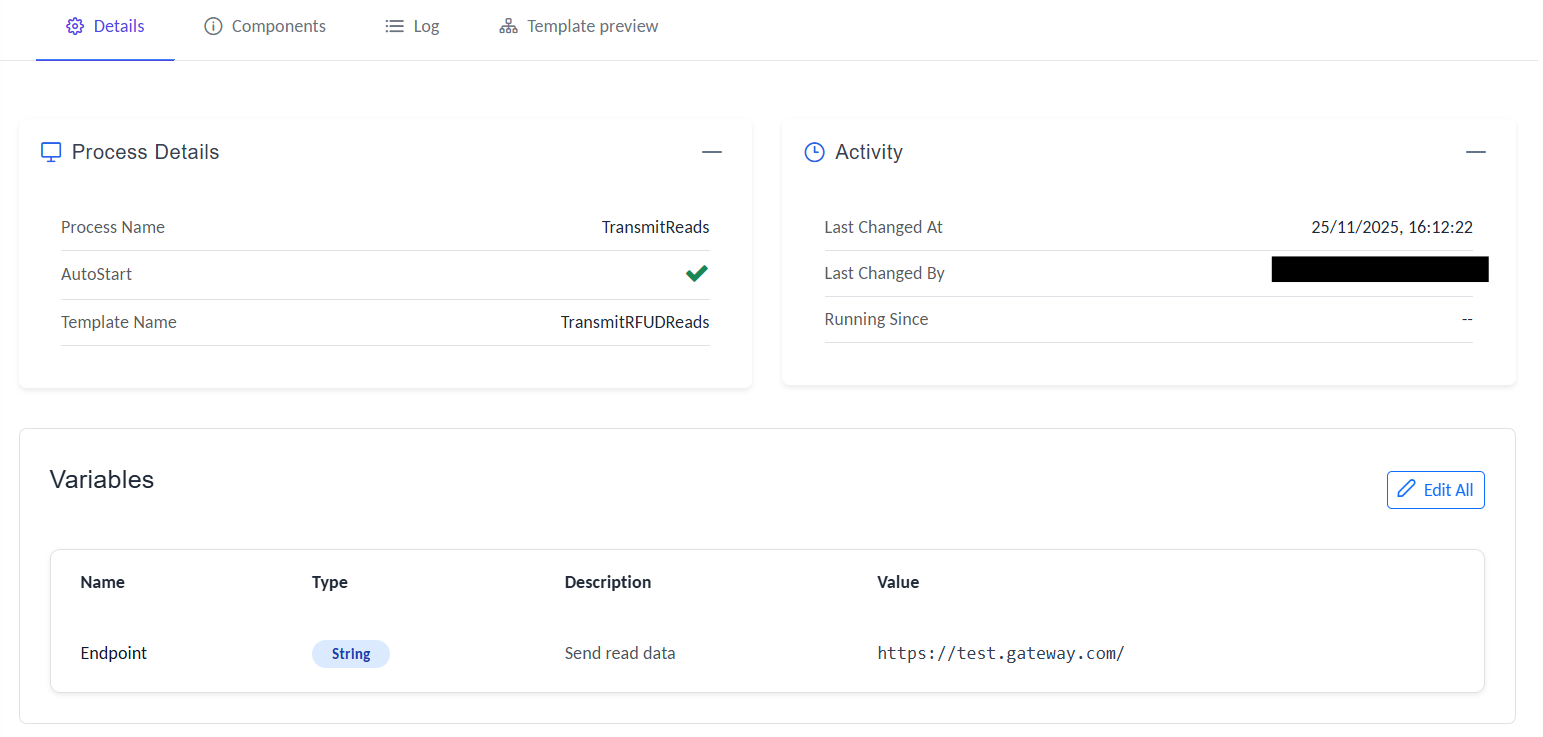
Process deatils and varible mapping
- Components – The page lists all process components, including their type, last known status, and most recent log entry for each component.
- Set log levels for each component separately using the log level option.
- Available levels:
SEVERE,ERROR,WARNING,INFO,CONFIG,FINE,FINER,FINEST - Logs at the selected level and higher will be shown; others will be excluded.
- For example, selecting
INFOdisplays logs taggedINFO,WARNING,ERROR, andSEVERE; others are ignored.
- Available levels:
- Set log levels for each component separately using the log level option.
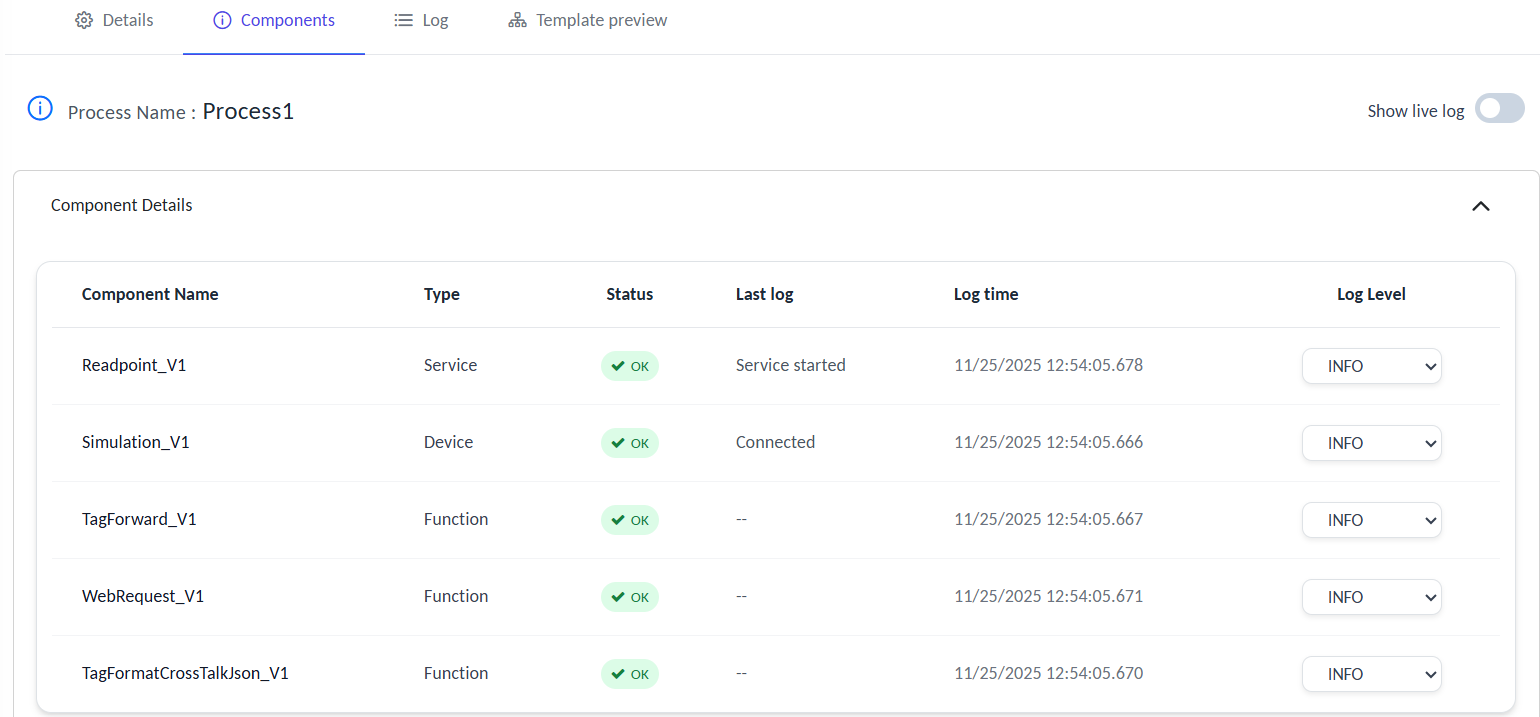
Manage process components
Enable Show live log to monitor process logs in real time
- Logs – This tab lists all process execution-related logs.
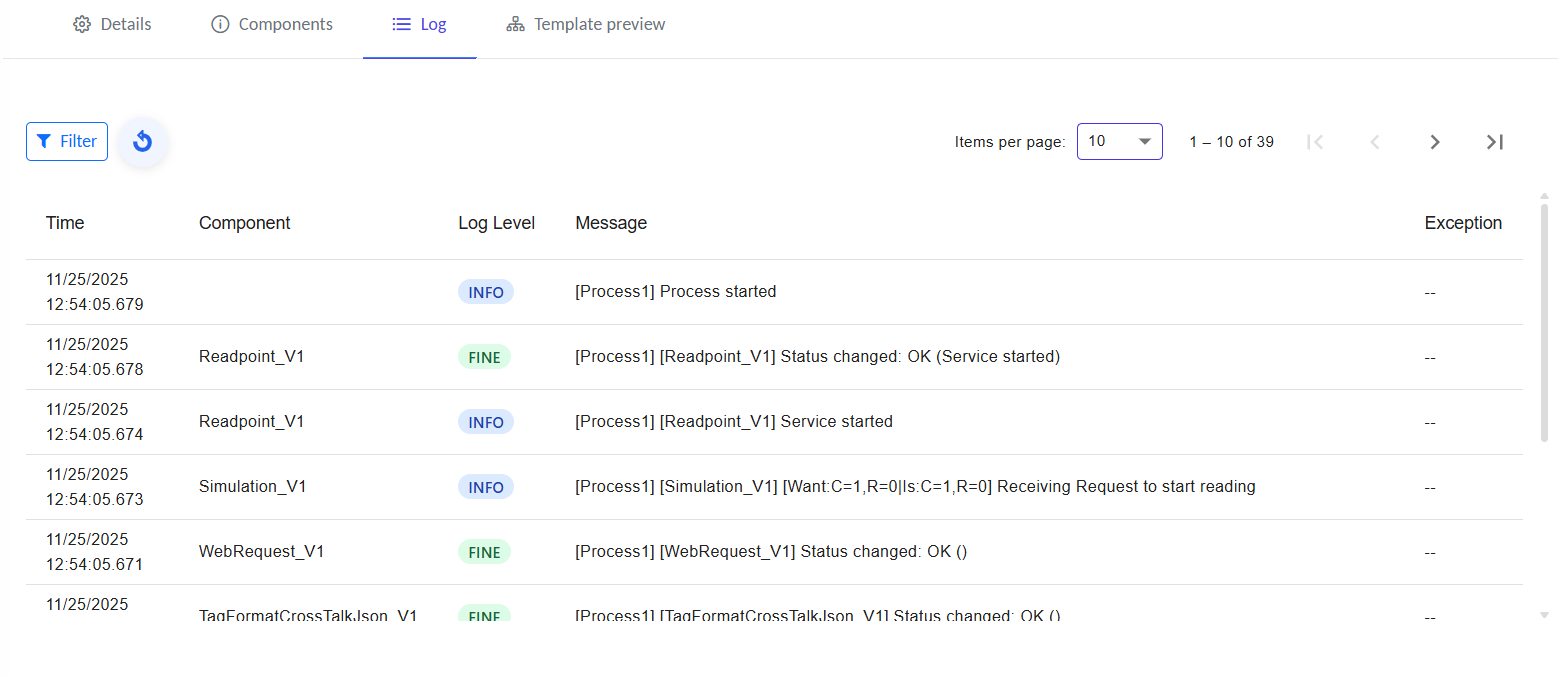
Execution log history for the selected process
- Template preview – Quick preview of your template (view only)
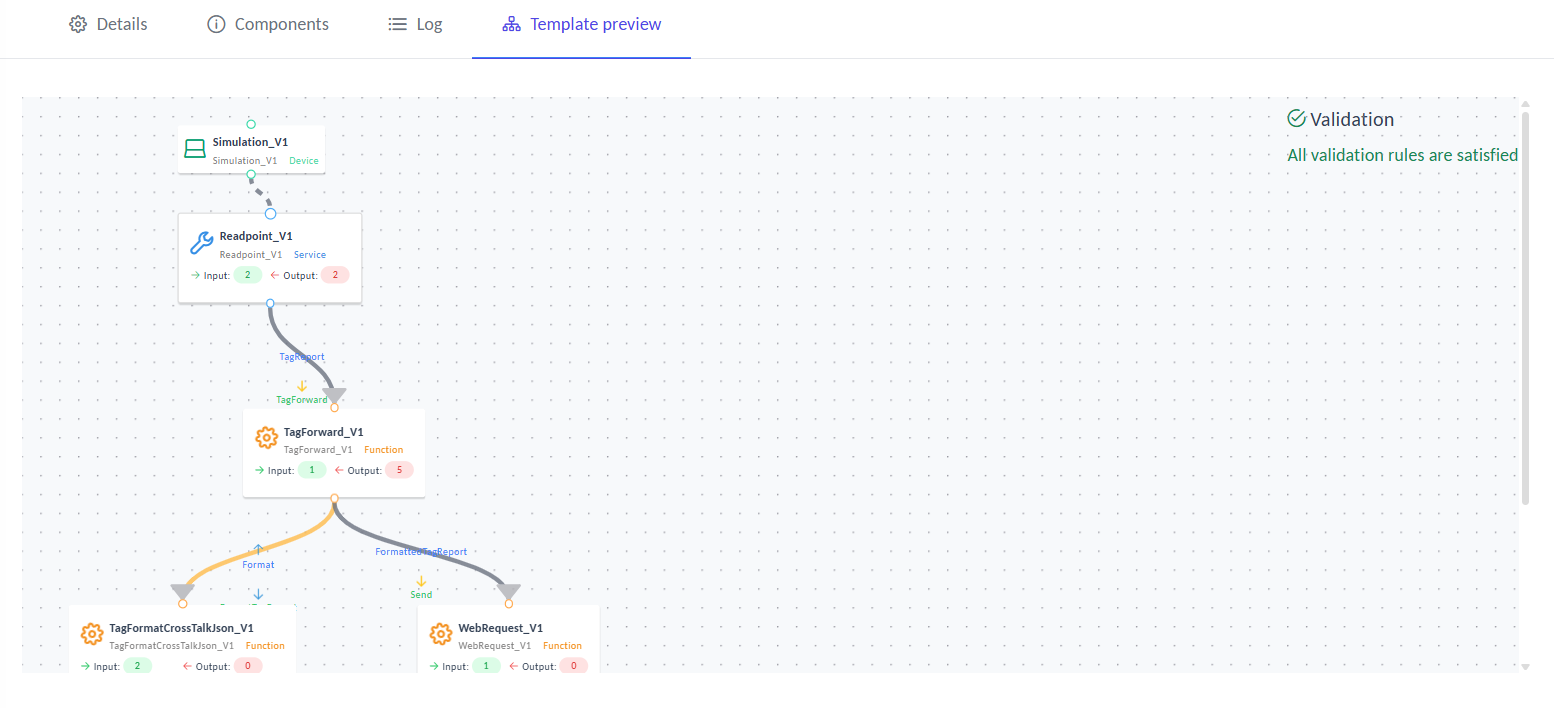
Execution log history for the selected process
The agent is now configured and ready. From the top bar, export the agent configuration and add it to your agent Edgeware.
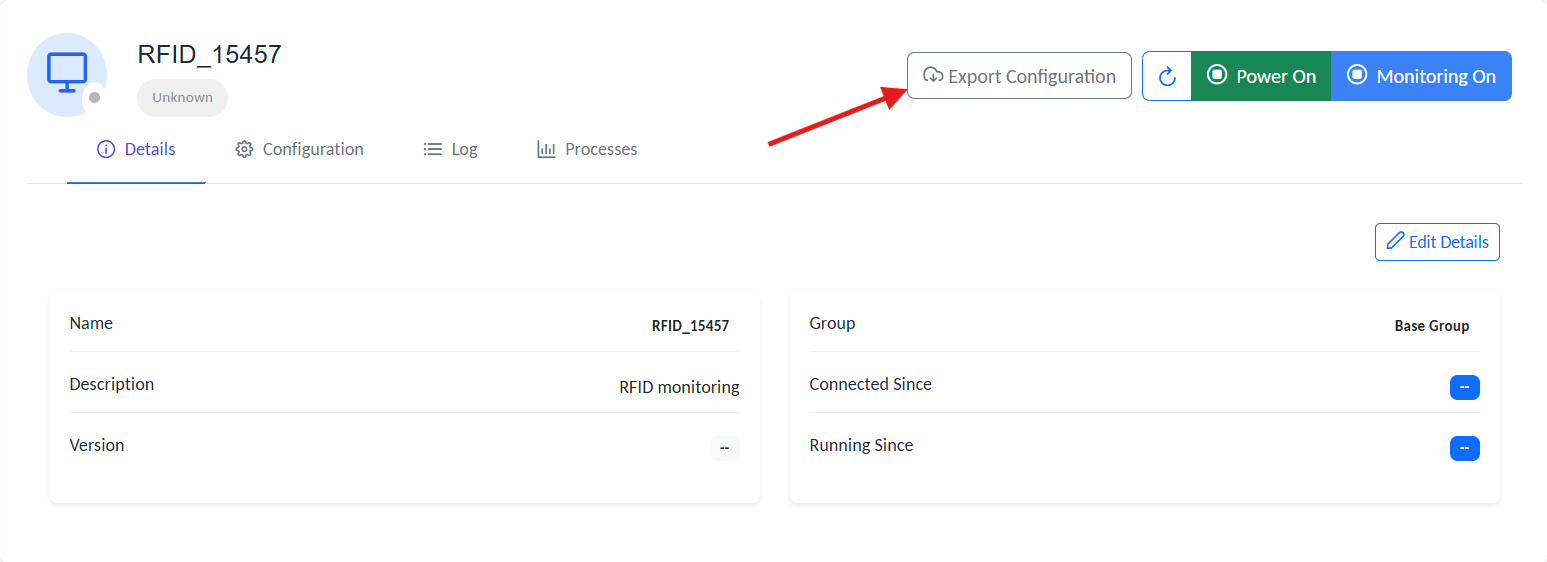
Export agent configuration to JSON
Install the Agent (on the Edge Host)
Registering an agent in the Gateway UI only creates its managed identity. To activate it, you must install and link the RCOM Agent on the target edge host where the actual device integration occurs.
Installation Steps
1. Download the RCOM Agent Edgeware
Obtain the appropriate installer or runtime package for your Agent Edgeware and copy it to the target edge host.
2. Run the Installer as Administrator/Root
Execute the installer with administrative privileges to ensure all required services and dependencies are properly created.
For a detailed installation guide, refer to:
3. Export the Agent Configuration from the Gateway
From the Agent configuration page, click Export Configuration to generate a JSON file containing connection details, process mappings, and operational parameters.
Download the agent’s config for deployment
4. Apply the Configuration to the Agent Edgeware
You can apply the exported configuration in two ways:
-
Option A: Using Swagger Interface
- Open the local runtime API at:
http://localhost:8080/swagger/index.html - Navigate to
setConfig - Replace the existing JSON with the exported configuration file
- Click Execute to apply the changes
- Open the local runtime API at:
-
Option B: Manual File Replacement
- Navigate to the configuration directory:
C:\ProgramData\RCOM\Gateway Agent\AgentConfig - Open the configuration file in a text editor
- Replace the existing JSON content with the exported data
- Save the file
- Navigate to the configuration directory:
5. Start the RCOM Agent Service Once started, the agent will automatically connect to the RCOM Gateway using the applied configuration.
Log Monitoring
Each RCOM Agent continuously records logs that help administrators track runtime activity and troubleshoot issues.
There are two types of logs:
- Agent Logs – Show operational updates such as power state, monitoring activity, and configuration sync with the Gateway.
- Process Logs – Display detailed execution events for each process running under the agent (e.g., reader data, web requests).
To view logs:
- Open Agent Details → Log for agent-level activity
- Open Process Details → Log for process-level details
For complete details, including log levels, structure, and best practices, see:
Expected Behavior
- Upon successful connection, the Agent Status in the Gateway dashboard changes from
Unknown→Updating. - The agent then downloads all required resources and dependencies from the Gateway.
- After initialization, the status updates to
Running, indicating that the agent is fully operational. - If Auto Start is enabled, the agent service will automatically restart whenever the host system reboots.