How to Create Your First Workflow in RCOM Gateway
Example: Adding a New Product to Inventory
Workflows are the backbone of automation in RCOM Gateway. They allow you to capture incoming data, transform it, and take action, all without writing complex code.
In this tutorial, we’ll build a workflow to add a new product to the inventory step by step. The goal is to receive product details via JSON (name, price, quantity, description, isFragile), and then save the product into the inventory database.
Prerequisites
Before you start, ensure you have:
-
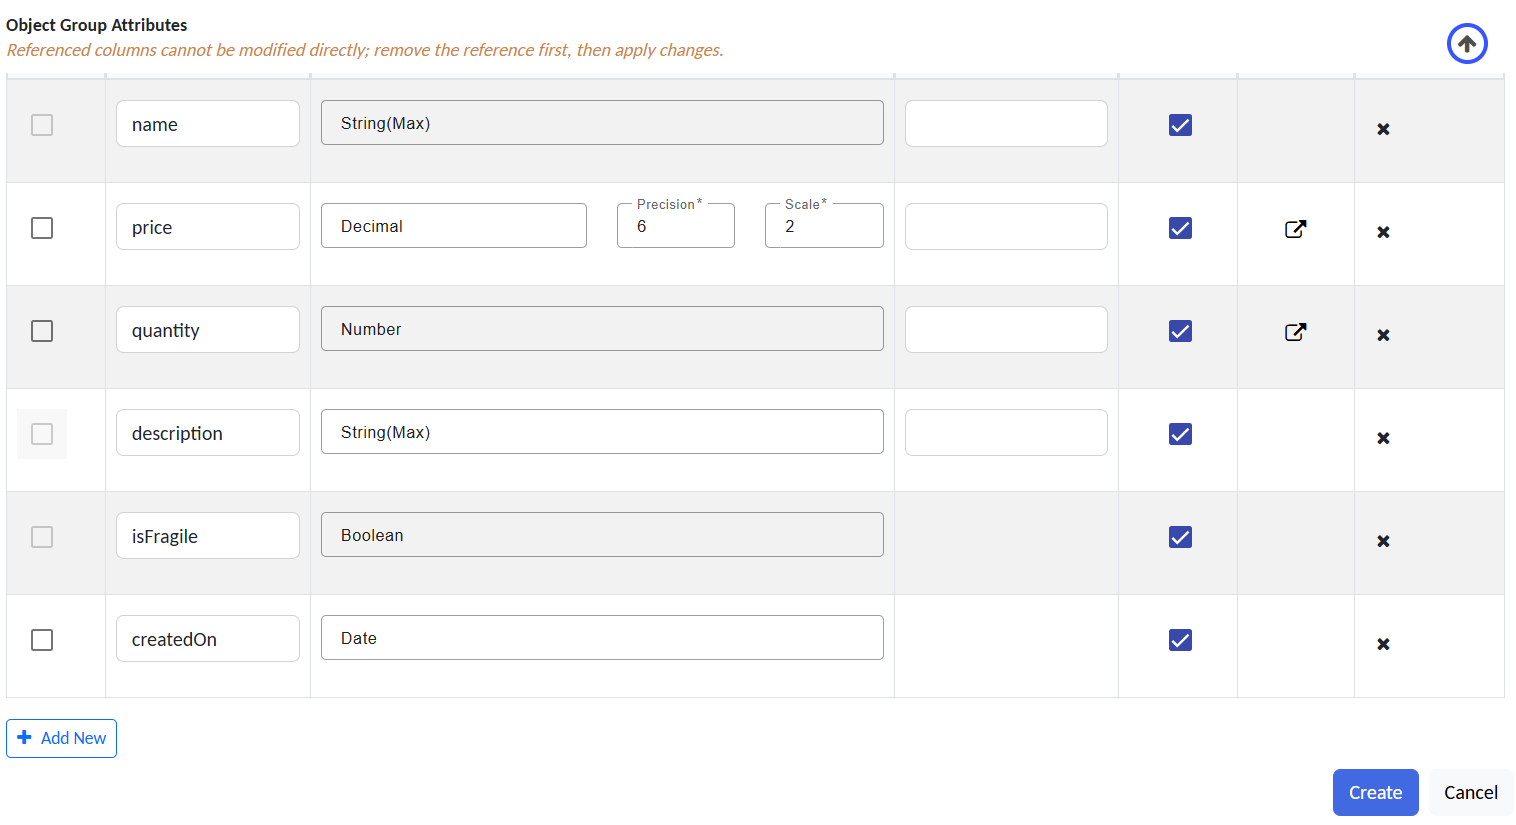
A Product Inventory Object Group created with attributes such as
name,price,quantity,isFragile, andcreatedOn.Schema showing attributes: name, price, quantity, isFragile, createdOn
-
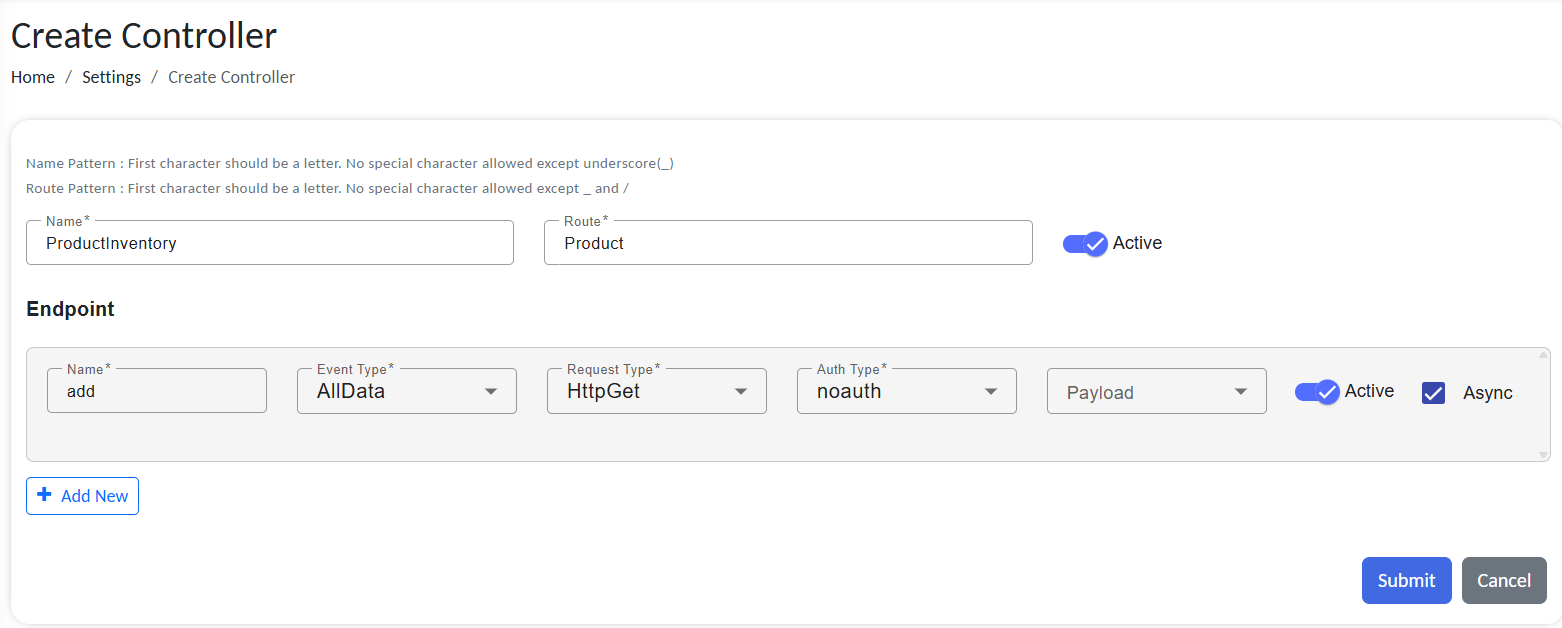
A REST API endpoint or other ingestion channel configured to accept product data as JSON.
Endpoint setup for accepting JSON product data
-
A basic understanding of variables and JSONPath extraction.
-
Our workflow will be triggered when new product data arrives through a REST API call.
Example JSON payload:
{
  "name": "Wireless Mouse",
  "price": 599,
  "quantity": 100,
  "isFragile": false
}
Why this matters: Object Groups store persistent business data (your digital twins). Workflows do the transformation and persistence. Endpoints and Event Processors feed events into workflows.
Understanding the Flow
The workflow will:
- Receive JSON input with product information.
- Extract and cast values into the correct data types.
- Assemble attributes into a structured dictionary.
- Create a new object in the Product Inventory Object Group.
- Respond to the caller with a success or failure message.
Step 0 - Create a synchronous REST route
Go to Settings → Client Settings → Endpoints → + New Endpoint.
Configure the Endpoint (example):
- Endpoint Name:
inventoryIngest - Base Route Path:
/RCOMENDPOINTAPI/inventory - Active: On
Click + Add Route and set:
- Route Name:
productAdd - Event Type:
AllData - Request Type:
HttpPost - Auth Type:
noauth(for tutorial only; use Basic/OAuth2 in production) - Async: unchecked (we want an immediate response)
Submit, then Sync the endpoints from the endpoint list page.
Why this matters: Synchronous routes let clients receive immediate confirmation or validation errors.
Step 1 - Create the workflow shell
Navigate to Workflows → Manage Workflows → + Add New.
- Workflow Name:
AddProductToInventory
Parameters → + Add:
- Parameter:
ProductData - Type:
String(we’ll receive the raw JSON body as a string)
Parameters are the data inputs your Event Processor will map from the incoming event.
Now ProductData will be JSON in the given format:
{
  "name": "Product name",
  "price": price,
  "quantity": qty,
  "isFragile": Boolean value
}
Workflow overview
The given example shows the workflow structure for this tutorial. Refer to it if you have questions about adding action modules.
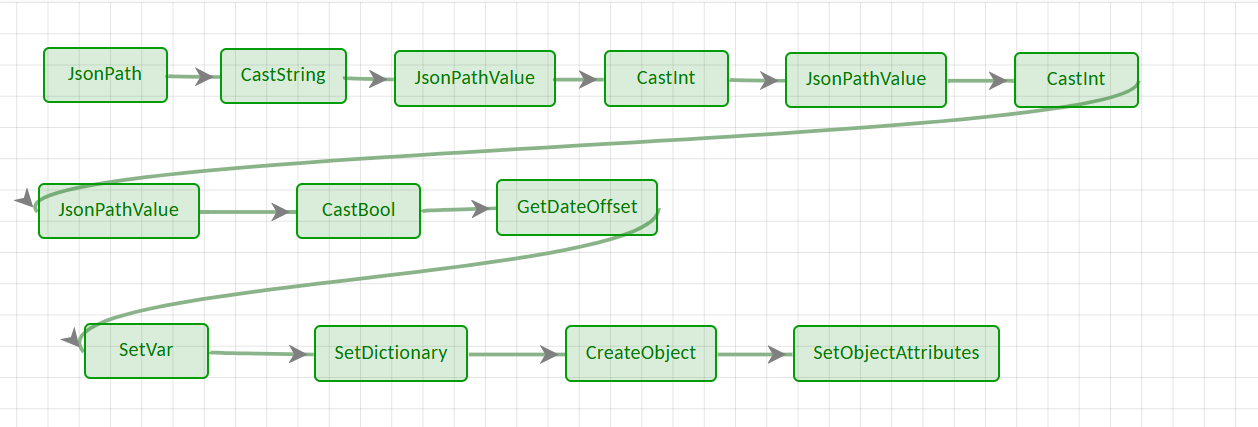
Workflow
Step 2 - Extract fields from JSON
You’ll pull values out of the ProductData JSON using JsonPath (for string-like results) or JsonPathValue (for typed results). Both actions save their output as an object; then you Cast that object to the final data type (String, Int, Bool).
JsonPath vs JsonPathValue
JsonPath→ use when you want a string-like result. This can also be achieved byJsonPathValue.JsonPathValue→ use when you need a specific typed result. SetRESULT_TYPEtoString,Int, orBool.
If the field is a number or boolean in the JSON (e.g., price, quantity, isFragile), use JsonPathValue.
Example: extract the product name
Add Action → JsonPath
Configure:
-
JSON_PATH = $.name
(Static parameter; the path is fixed.$is used to access the selected variable.) -
SOURCE_VAR = ProductData
(Dynamic parameter; it reads the variable available in scope.) -
RESULT_VAR = ProductName
(Holds the extracted value as an object.)
Add Action → CastString
Configure:
SOURCE_VAR = ProductName(Dynamic; the object from the previous step)RESULT_VAR = PRODUCT_NAME(Final string you’ll use later)
Now the product’s name is available as a plain string in PRODUCT_NAME.
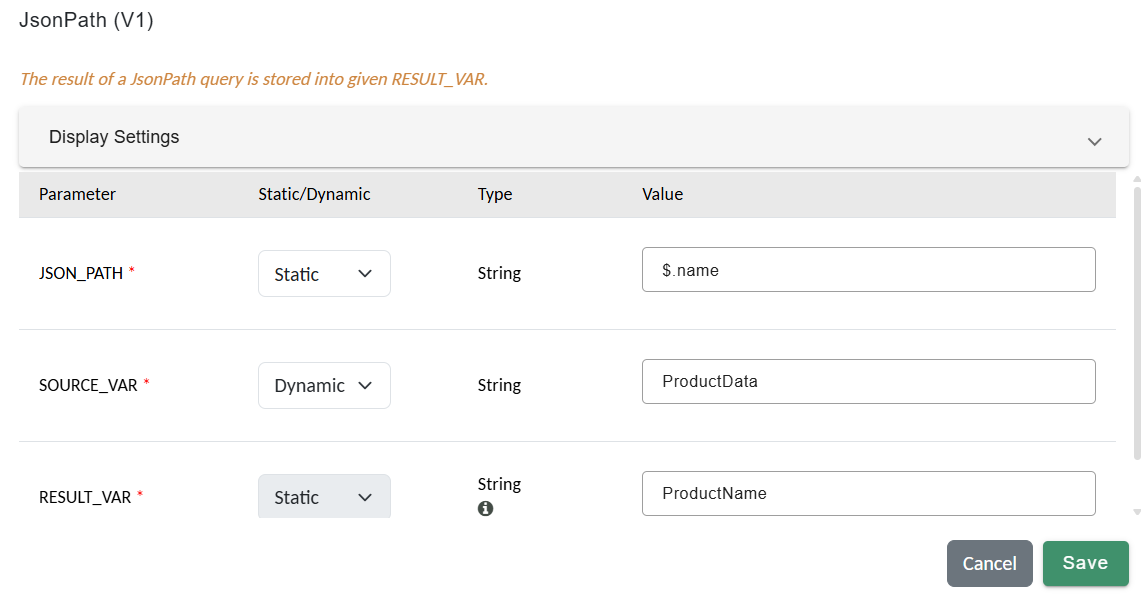
JsonPath configuration to extract the product name.
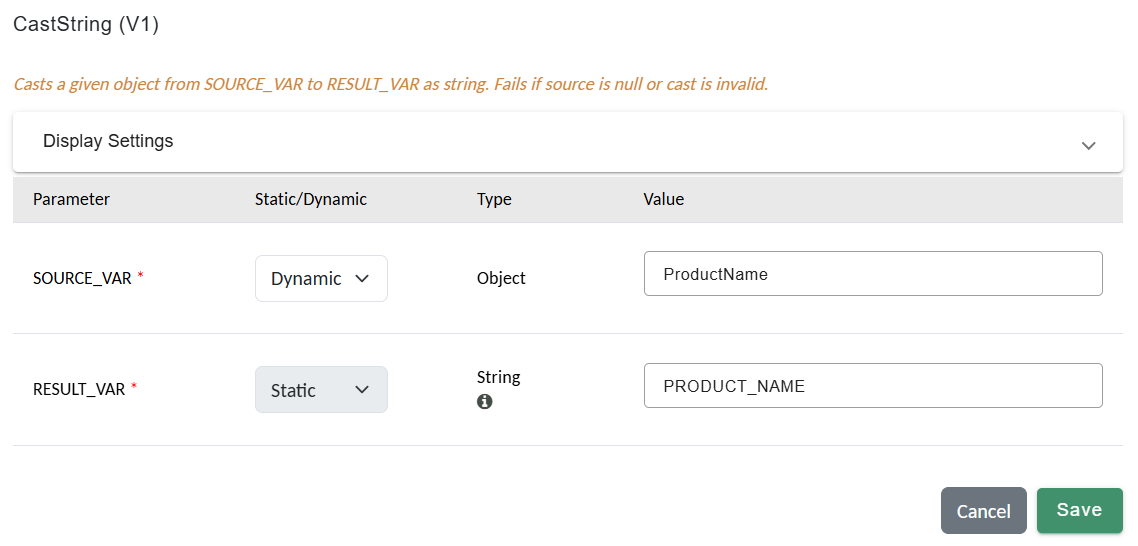
Cast the extracted object to a plain string for use.
Do the same for other attributes
Name
JsonPath ($.name)→RESULT_VAR = ProductNameCastString→RESULT_VAR = PRODUCT_NAME
Price
JsonPathValue ($.price)withRESULT_TYPE = Int(static) →RESULT_VAR = ProductPriceCastInt→RESULT_VAR = PRODUCT_PRICE
Quantity
JsonPathValue ($.quantity)withRESULT_TYPE = Int(static) →RESULT_VAR = ProductQtyCastInt→RESULT_VAR = PRODUCT_QTY
Is Fragile
JsonPathValue ($.isFragile)withRESULT_TYPE = Bool(static) →RESULT_VAR = IsFragileCastBool→RESULT_VAR = IS_FRAGILE
- Order of actions: Extract (
JsonPath/JsonPathValue) → Cast. - Why cast? JSON actions store results as objects. Cast actions convert those objects to the exact type you need for downstream steps.
- Keep paths (e.g.,
$.name) Static, and source variables (e.g.,ProductData) Dynamic. - Use clear, consistent variable names (e.g.,
PRODUCT_NAME,PRODUCT_PRICE) to make later steps easy to read.
Step 3 - Add metadata (CreatedOn timestamp)
Not every field comes from the input JSON. For auditability, add a CreatedOn timestamp when you create the product.
GetDateOffset — returns the current system date/time (or a date/time offset from now).
Add Action → GetDateOffset
Set these parameters:
-
USE_UTC = true/false(Static • Bool)true→ store the timestamp in UTCfalse→ store the timestamp in the server’s local time
-
RESULT_VAR = CreatedOn(Static • String)- The timestamp object will be saved in
CreatedOn.
- The timestamp object will be saved in
-
CreatedOnnow holds the creation timestamp (object).
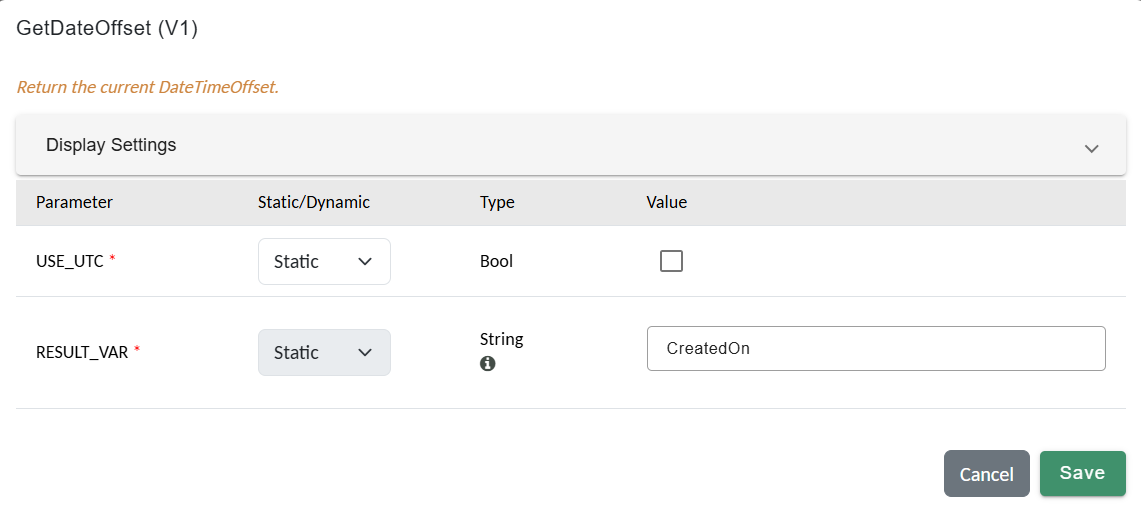
GetDateOffset action configured to store current timestamp.
Why this matters: Adding timestamps lets you track when an object was created or last updated - critical for stock and history reporting.
Step 4 - Build a key–value dictionary for attributes
You now have these variables ready: PRODUCT_NAME, PRODUCT_PRICE, PRODUCT_QTY, IS_FRAGILE, and CreatedOn.
To send them to object storage (via SetObjectAttributes), you must first assemble them into a Dictionary<string, object>.
1. Create the dictionary variable
Add Action → SetVar
- **NAME =
ProductAttributes(Static) - **TYPE =
Dictionary<string, object>(Static) - **VALUE =
{}(Static; initializes an empty dictionary)
Result: an empty dictionary stored in
ProductAttributes.
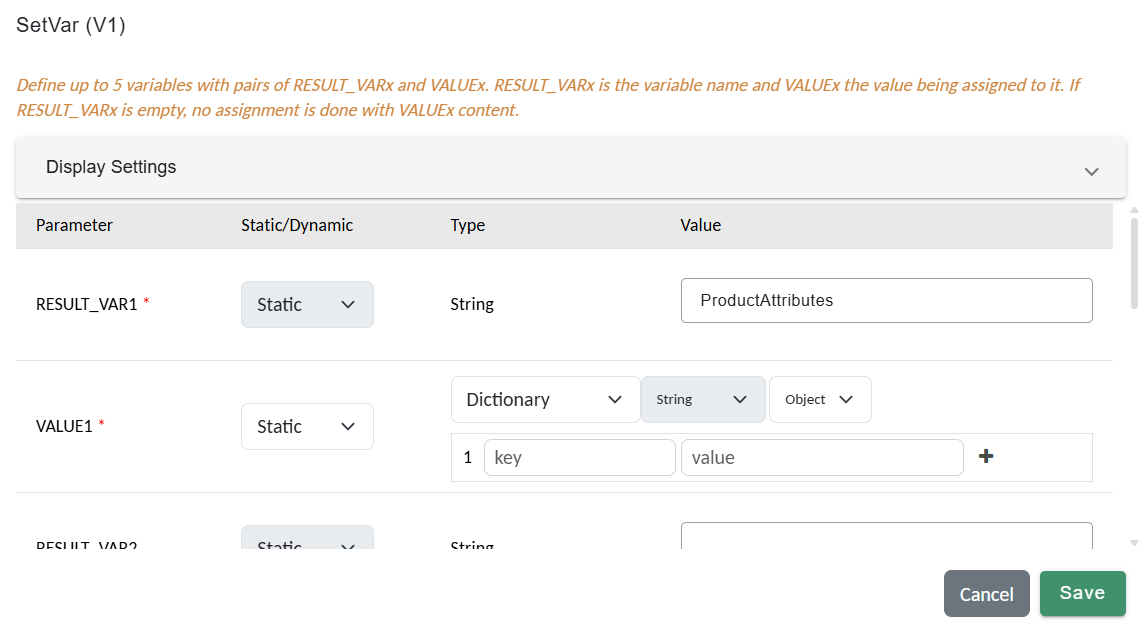
SetVar action to create an empty dictionary for product attributes.
2. Add entries to the dictionary
Add Action → SetDictionary
- OBJECT_ID =
ProductAttributes(Dynamic; select the dictionary you just created)
Now define key–value pairs (keys are literals that match your object group attributes, values are your variables):
| Param | Key | Value | Value Type |
|---|---|---|---|
| KEY1 / VALUE1 | name | PRODUCT_NAME | String |
| KEY2 / VALUE2 | price | PRODUCT_PRICE | Int |
| KEY3 / VALUE3 | qty | PRODUCT_QTY | Int |
| KEY4 / VALUE4 | isFragile | IS_FRAGILE | Bool |
| KEY5 / VALUE5 | createdOn | CreatedOn | DateTimeOffset |
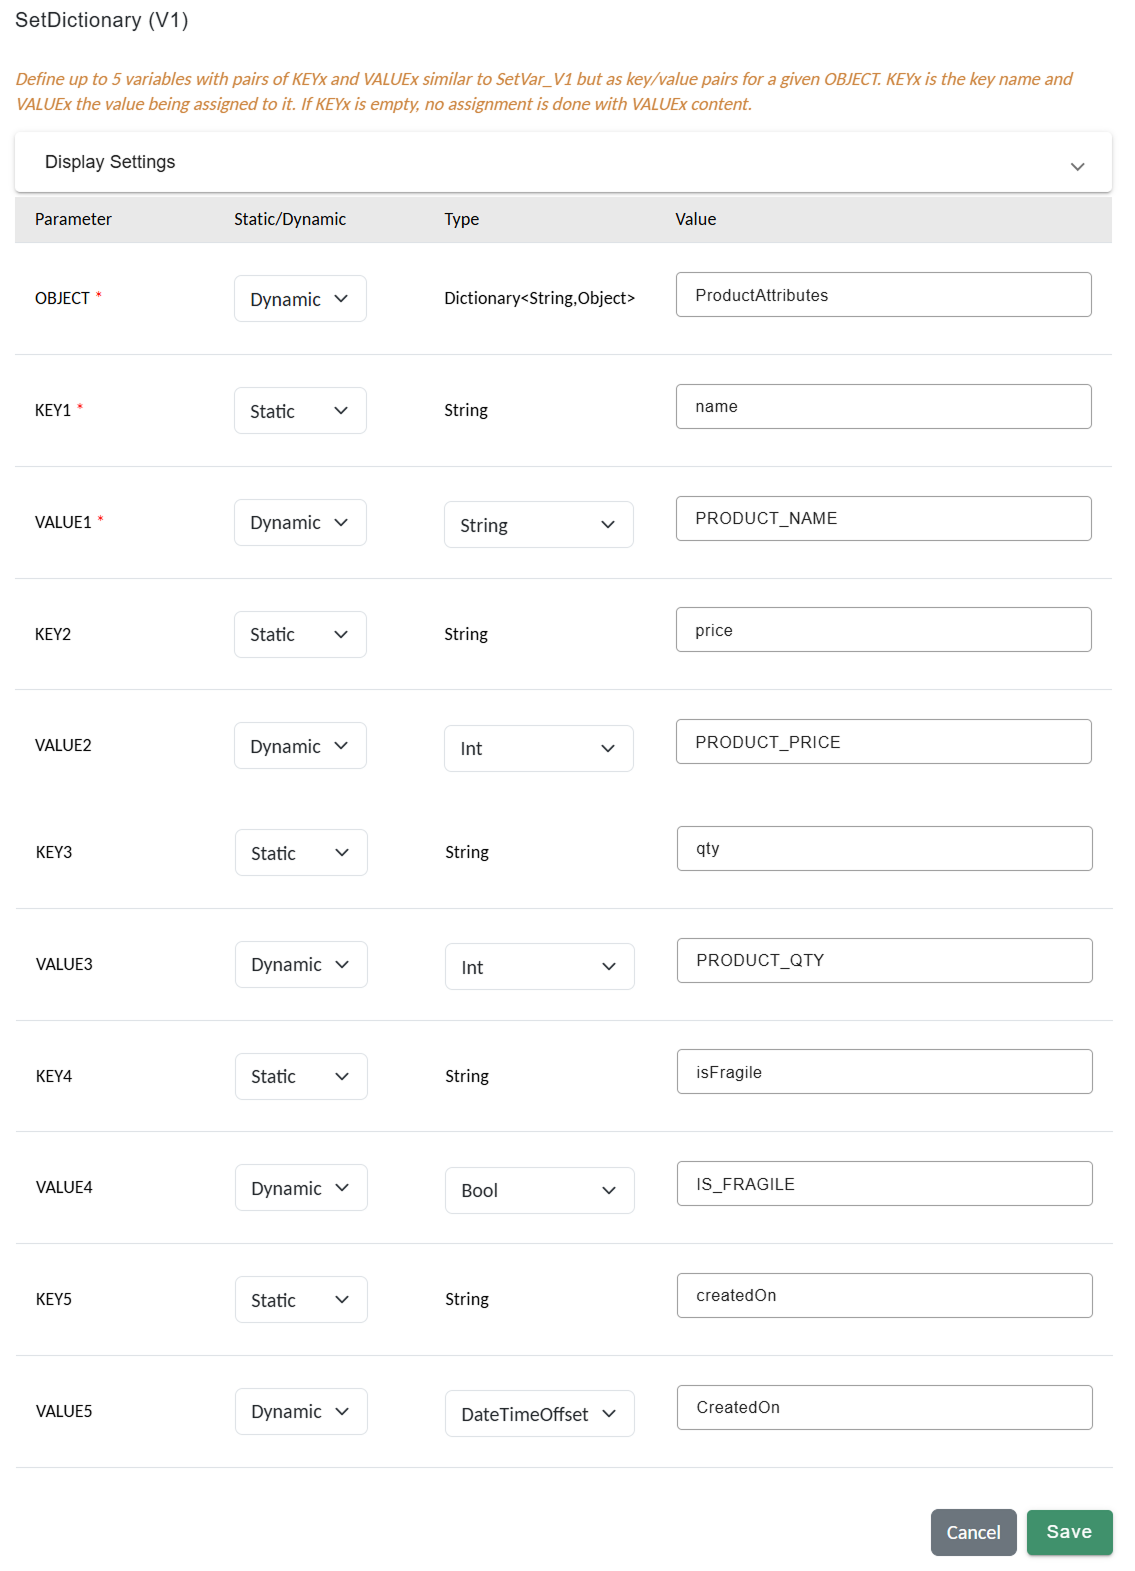
SetDictionary action with keys and corresponding typed values.
- Keys (
name,price,qty,isFragile,createdOn) are Static strings that match your ObjectGroup attribute names. - Values reference the variables you extracted/cast earlier and are Dynamic.
- If you want to use a custom value you can set the value type to static and add a custom value of defined type.
- Ensure
isFragileuses Bool, not Int.
Result:
ProductAttributesdictionary with all the received variables as key–value pairs.
Step 5 - Create the Product object
To persist the product in the inventory database, first create an object in the Product Inventory Object Group. In RCOM Gateway, objects are digital twins of real items.
CreateObject — creates a new record and returns a unique OBJECT_ID.
Add Action → CreateObject
Set:
- RESULT_VAR =
PRODUCT_ID(Static • String)
Result: A new product object is created and its unique ID is stored in
PRODUCT_ID.
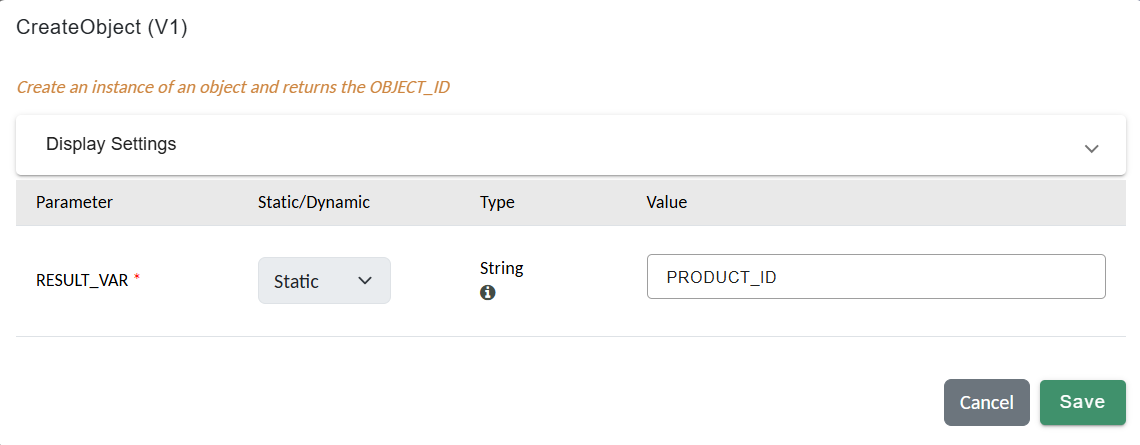
Configure CreateObject action to generate a new product object.
Step 6 — Assign attributes to the product
With the object created and your attributes prepared, populate the object’s fields in one shot.
Prerequisites
-
PRODUCT_ID— fromCreateObject(Step 5) -
ProductAttributes—Dictionary<string, object>built in Step 3(e.g.,
name,price,qty,isFragile,createdOn)
SetObjectAttributes — writes a dictionary of attributes to an existing object.
Add Action → SetObjectAttributes
Set:
- OBJECT_ID =
PRODUCT_ID(Dynamic; the object you just created) - GROUP = (Static, select the group used to display stock/inventory view; choose as per your UI configuration)
- OBJECT_GROUP_NAME = Product Inventory (Static; your object group name)
- ATTRIBUTE_DATACONTEXT =
ProductAttributes(Dynamic; the dictionary you assembled)
Result: All attributes in
ProductAttributesare applied to the object identified byPRODUCT_IDand saved to the database.
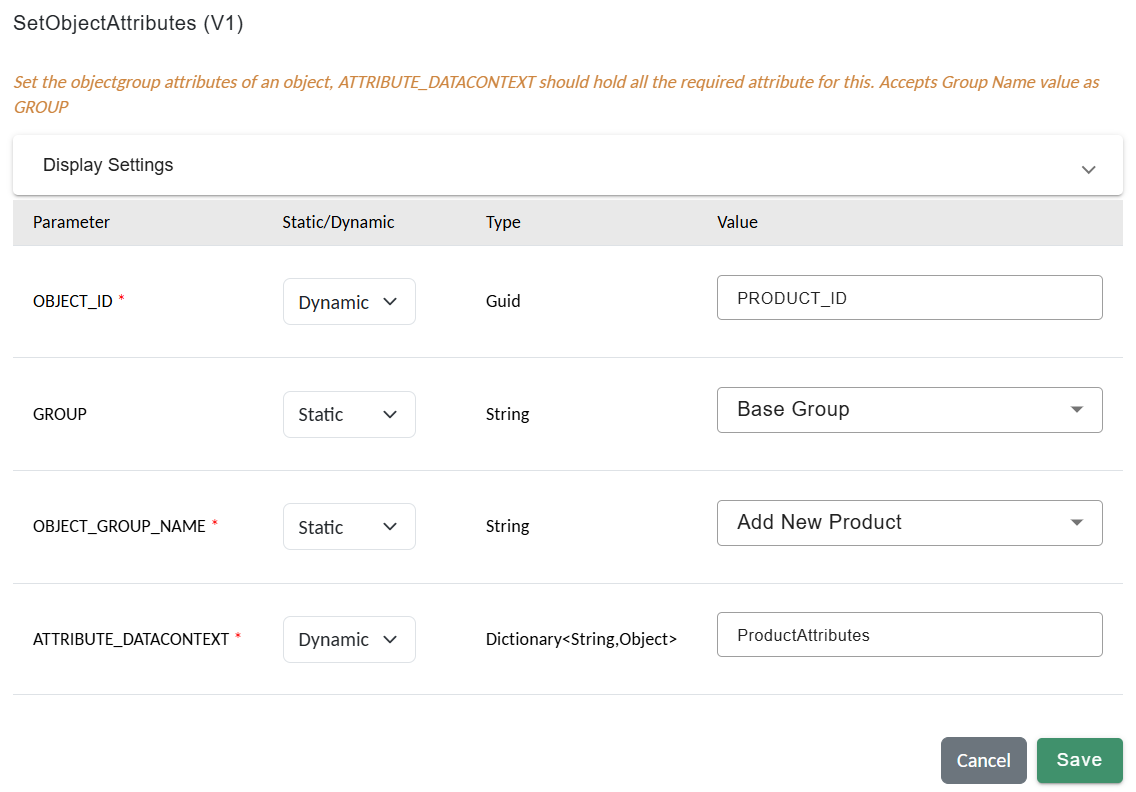
SetObjectAttributes action to persist product data to the object group.
Why this matters: Object groups enforce schema rules (types, required fields, keys). SetObjectAttributes ensures the object conforms to that schema and persists cleanly for inventory/stock views and reporting.
Quick checks & common pitfalls
-
Make sure
ProductAttributesis not empty and uses the correct types
(e.g.,isFragile = Bool,price/qty = Int,createdOn = DateTimeOffset). -
Confirm
OBJECT_GROUP_NAMEmatches the exact group name used in Step 5’sCreateObject. -
Use a consistent timezone for
createdOn(e.g.,USE_UTC = truewhen generating it).
That’s it!, Once the workflow runs, the product is created and saved in the inventory.
Next Steps
Linking Workflow with Ingestion
Workflows don’t run in isolation. They are triggered by Event Processors.
For this use case:
- Create a REST API Endpoint (e.g.,
/RCOMENDPOINTAPI/inventory/addProduct). - Create an Event Processor:
- Event Source: Endpoint.
- Trigger Type:
AllData. - Workflow
- Variable Mapping: Map incoming JSON to workflow parameters.
Now, any POST request to the endpoint will trigger the workflow automatically.
Testing the Workflow
Send this request using Postman or curl:
Content-Type: application/json
{
  "name": "Wireless Mouse",
  "price": 599,
  "quantity": 100,
  "isFragile": false
}
Expected result: New object added to inventory (Listed under Stock View)
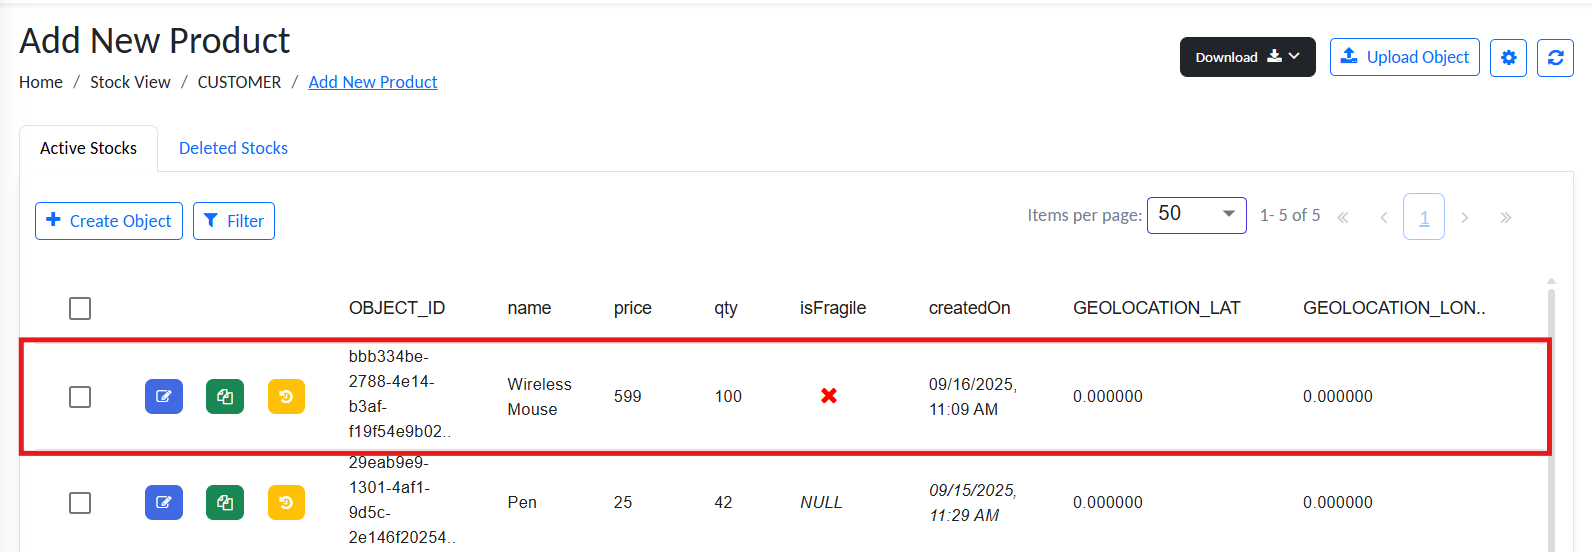
Inventory with new product.
Recap
In this tutorial, we:
- Extracted JSON input values with JsonPathValue.
- Cast values into correct types with CastString, CastInt, and CastBool.
- Added metadata using GetDateOffset.
- Combined everything into a dictionary using SetVar.
- Created and updated a product object with CreateObject and SetObjectAttributes.
- Connected the workflow to an endpoint via Event Processor.
This ingest → transform → persist → respond pattern is a foundation you can reuse for almost any workflow in RCOM Gateway.